Android Fragments Tutorial with Examples
1. What is Android Fragment?
To design an interface, you can design fragments and put it together. In this example, I will guide you to work with the fragment.
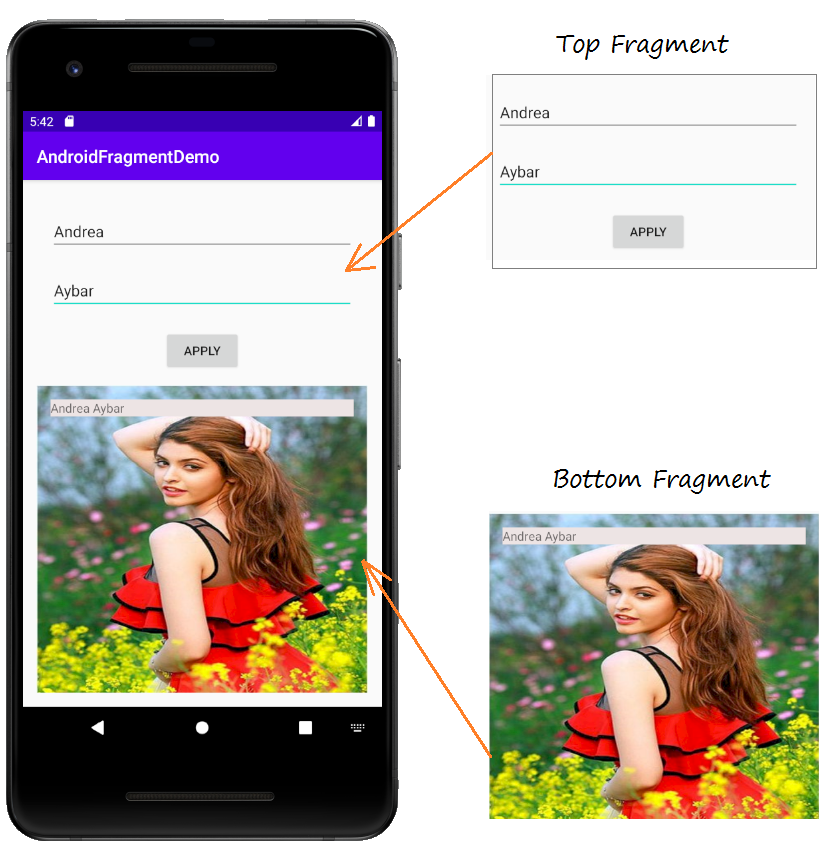
And process event which interacts between 2 fragment.
2. Android Fragment Example
No ADS
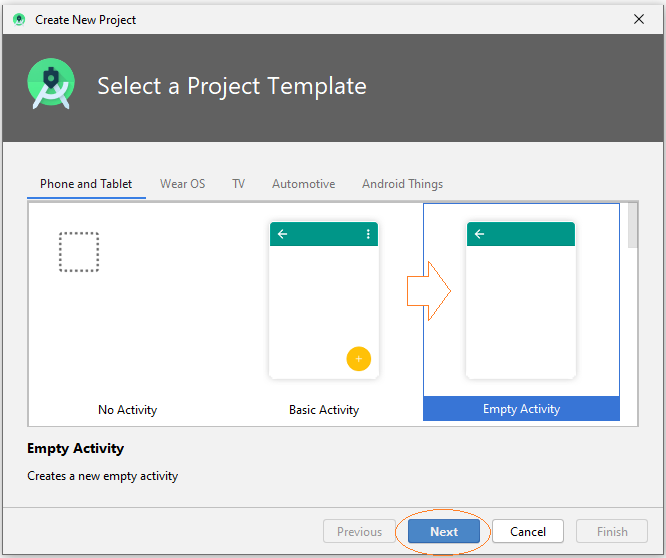
Create a Project named AndroidFragmentDemo
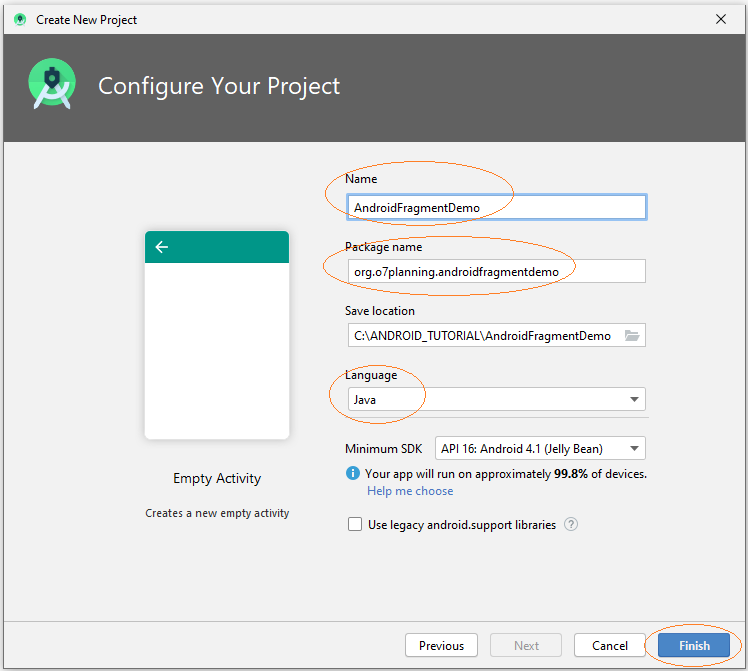
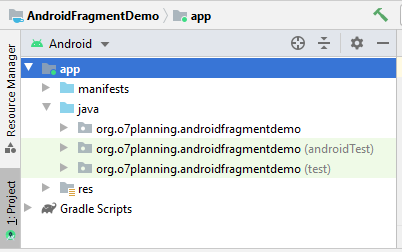
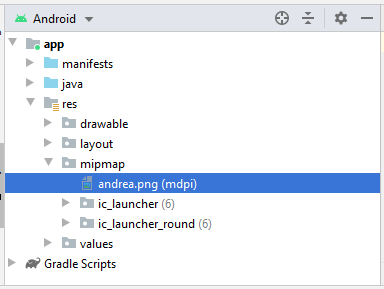
Prepare an image file, such as:
- andrea.png

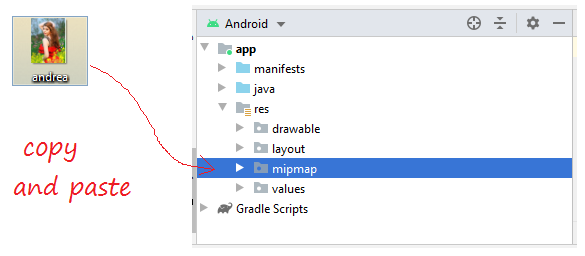
Copy and paste andrea.jpg file to mipmap folder of project
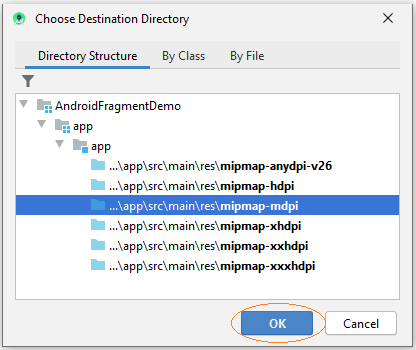
Android Studio will require you to choose imagine quality that will be created. Select mipmap-mdpi as this is the average image quality.
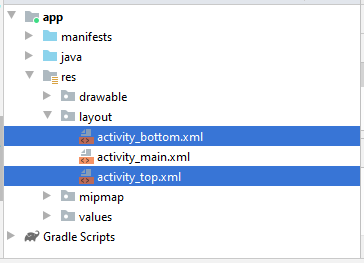
Next we create activity_top.xml file:
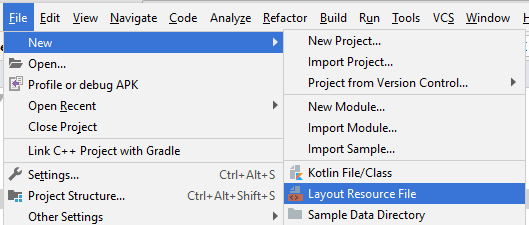
In Android Studio select:
- File > New > Layout Resource file
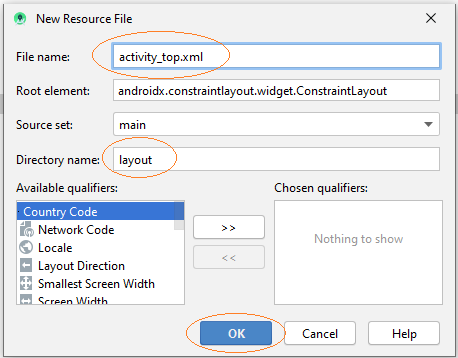
Enter:
- File name: activity_top.xml
- Root element: androidx.constraintlayout.widget.ConstraintLayout
- Directory name: layout
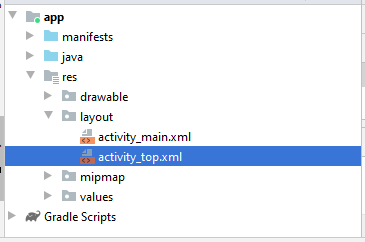
Similarly create activity_bottom.xml file.
Design Interface on activity_top.xml
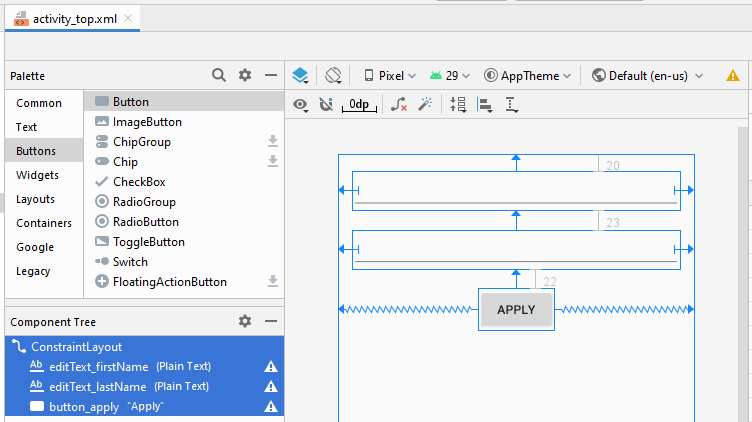
activity_top.xml
<?xml version="1.0" encoding="utf-8"?>
<androidx.constraintlayout.widget.ConstraintLayout
    xmlns:android="http://schemas.android.com/apk/res/android"
    xmlns:app="http://schemas.android.com/apk/res-auto"
    xmlns:tools="http://schemas.android.com/tools"
    android:layout_width="match_parent"
    android:layout_height="match_parent">

    <EditText
        android:id="@+id/editText_firstName"
        android:layout_width="0dp"
        android:layout_height="wrap_content"
        android:layout_marginStart="16dp"
        android:layout_marginLeft="16dp"
        android:layout_marginTop="20dp"
        android:layout_marginEnd="16dp"
        android:layout_marginRight="16dp"
        android:ems="10"
        android:inputType="textPersonName"
        app:layout_constraintEnd_toEndOf="parent"
        app:layout_constraintStart_toStartOf="parent"
        app:layout_constraintTop_toTopOf="parent" />

    <EditText
        android:id="@+id/editText_lastName"
        android:layout_width="0dp"
        android:layout_height="wrap_content"
        android:layout_marginStart="16dp"
        android:layout_marginLeft="16dp"
        android:layout_marginTop="23dp"
        android:layout_marginEnd="16dp"
        android:layout_marginRight="16dp"
        android:ems="10"
        android:inputType="textPersonName"
        app:layout_constraintEnd_toEndOf="parent"
        app:layout_constraintStart_toStartOf="parent"
        app:layout_constraintTop_toBottomOf="@+id/editText_firstName" />

    <Button
        android:id="@+id/button_apply"
        android:layout_width="wrap_content"
        android:layout_height="wrap_content"
        android:layout_marginTop="22dp"
        android:text="Apply"
        app:layout_constraintEnd_toEndOf="parent"
        app:layout_constraintStart_toStartOf="parent"
        app:layout_constraintTop_toBottomOf="@+id/editText_lastName" />
</androidx.constraintlayout.widget.ConstraintLayout>
Design Interface on activity_bottom.xml
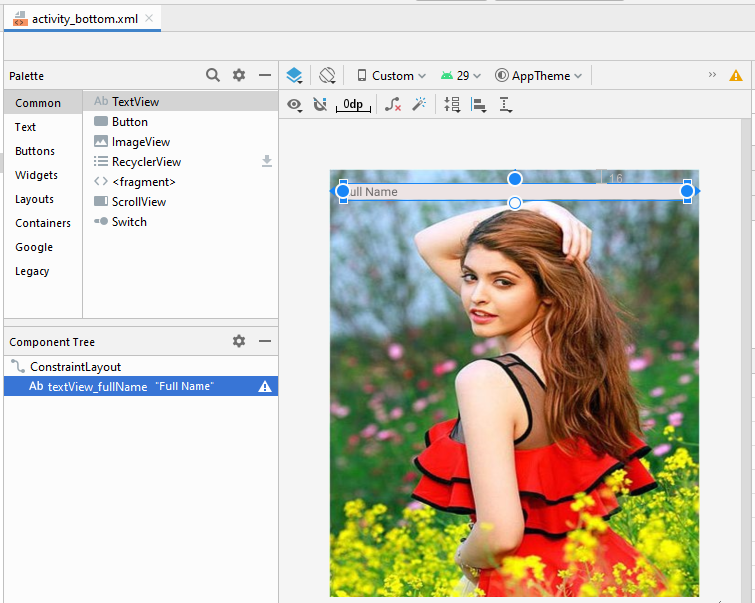
activity_bottom.xml
<?xml version="1.0" encoding="utf-8"?>
<androidx.constraintlayout.widget.ConstraintLayout
    xmlns:android="http://schemas.android.com/apk/res/android"
    xmlns:app="http://schemas.android.com/apk/res-auto"
    xmlns:tools="http://schemas.android.com/tools"
    android:layout_width="match_parent"
    android:layout_height="match_parent"
    android:background="@mipmap/andrea">

    <TextView
        android:id="@+id/textView_fullName"
        android:layout_width="0dp"
        android:layout_height="wrap_content"
        android:layout_marginStart="16dp"
        android:layout_marginLeft="16dp"
        android:layout_marginTop="16dp"
        android:layout_marginEnd="16dp"
        android:layout_marginRight="16dp"
        android:background="#EDE4E4"
        android:text="Full Name"
        app:layout_constraintEnd_toEndOf="parent"
        app:layout_constraintStart_toStartOf="parent"
        app:layout_constraintTop_toTopOf="parent" />
</androidx.constraintlayout.widget.ConstraintLayout>
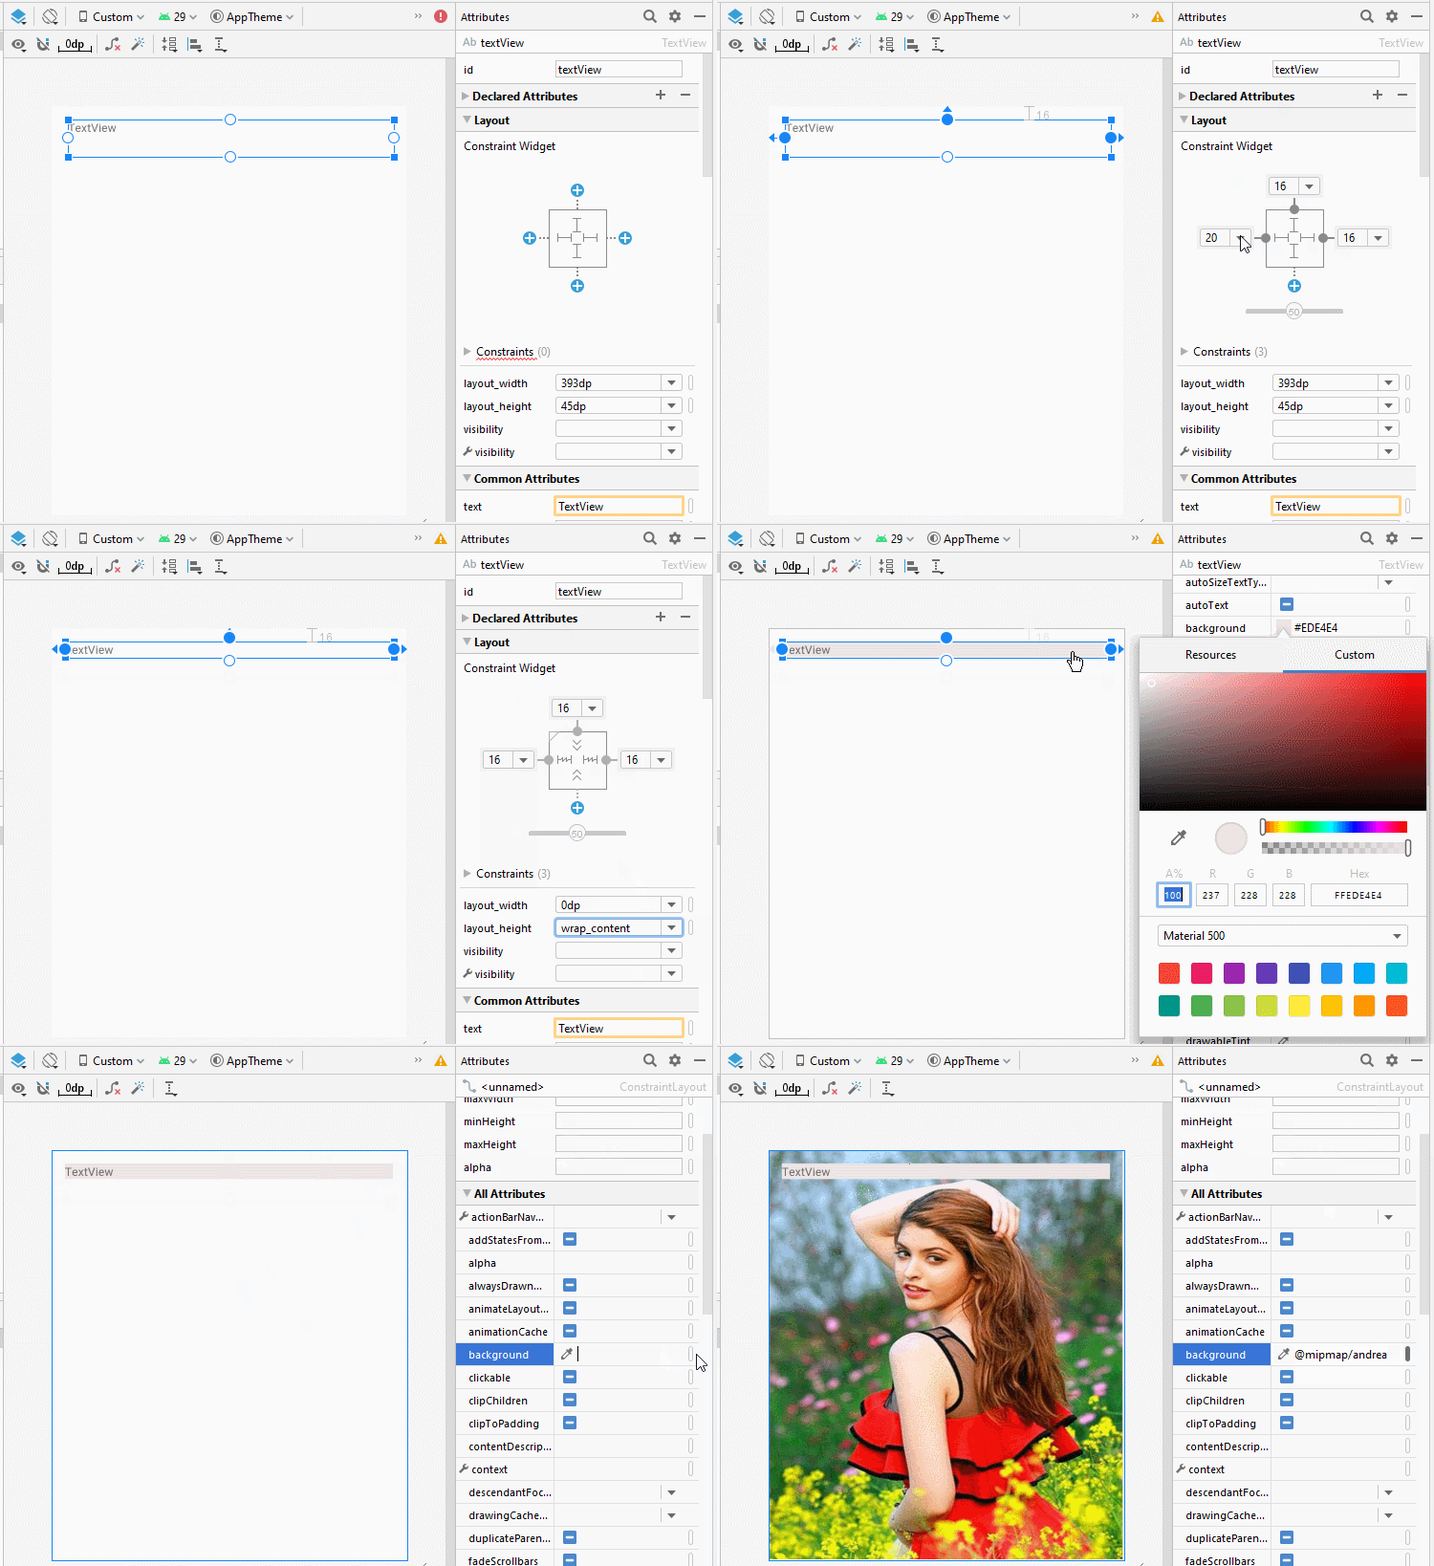
If you are interested in the steps to design the interface of this application, see the appendix at the end of the article.
Each fragment will correspond to a Java class. This class is extended from Fragment class
Create 2 class: TopFragment and BottomFragment and edit its code.
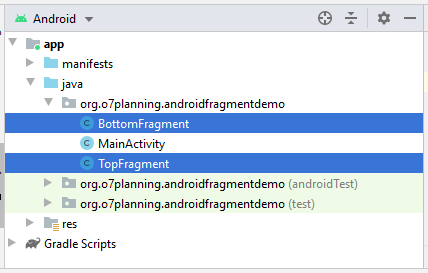
TopFragment .java
package org.o7planning.androidfragmentdemo;

import android.content.Context;
import android.os.Bundle;

import android.view.LayoutInflater;
import android.view.View;
import android.view.ViewGroup;
import android.widget.Button;
import android.widget.EditText;

import androidx.annotation.Nullable;
import androidx.fragment.app.Fragment;

public class TopFragment extends Fragment {

    private EditText editTextFirstName;
    private EditText editTextLastName;
    private Button buttonApply;

    private MainActivity mainActivity;

    @Nullable
    @Override
    public View onCreateView(LayoutInflater inflater, ViewGroup container, Bundle savedInstanceState) {


        // Read xml file and return View object.
        // inflate(@LayoutRes int resource, @Nullable ViewGroup root, boolean attachToRoot)
        View view = inflater.inflate(R.layout.activity_top, container, false);

        editTextFirstName = (EditText) view.findViewById(R.id.editText_firstName);
        editTextLastName = (EditText) view.findViewById(R.id.editText_lastName);

        buttonApply = (Button) view.findViewById(R.id.button_apply);

        buttonApply.setOnClickListener(new View.OnClickListener() {

            @Override
            public void onClick(View v) {
                applyText();
            }
        });

        return view;
    }

    // Called when a fragment is first attached to its context.
    @Override
    public void onAttach(Context context) {
        super.onAttach(context);

        if (context instanceof MainActivity) {
            this.mainActivity = (MainActivity) context;
        }
    }


    private void applyText() {
        String firstName = this.editTextFirstName.getText().toString();
        String lastName = this.editTextLastName.getText().toString();

        this.mainActivity.showText(firstName, lastName);
    }
}
BottomFragment.java
package org.o7planning.androidfragmentdemo;

import android.os.Bundle;
import android.view.LayoutInflater;
import android.view.View;
import android.view.ViewGroup;
import android.widget.TextView;

import androidx.annotation.Nullable;
import androidx.fragment.app.Fragment;

public class BottomFragment extends Fragment {

    private TextView textViewFullName;

    @Nullable
    @Override
    public View onCreateView(LayoutInflater inflater, ViewGroup container, Bundle savedInstanceState) {

        // Read xml file and return View object.
        // inflate(@LayoutRes int resource, @Nullable ViewGroup root, boolean attachToRoot)
        View view = inflater.inflate(R.layout.activity_bottom, container, false);

        textViewFullName = (TextView) view.findViewById(R.id.textView_fullName);

        return view;
    }


    public void showText(String firstName, String lastName) {
        textViewFullName.setText(firstName + " " + lastName);
    }
}
Now, you need to arrange the fragment on the main interface of the Activity. Open activity_main.xml file
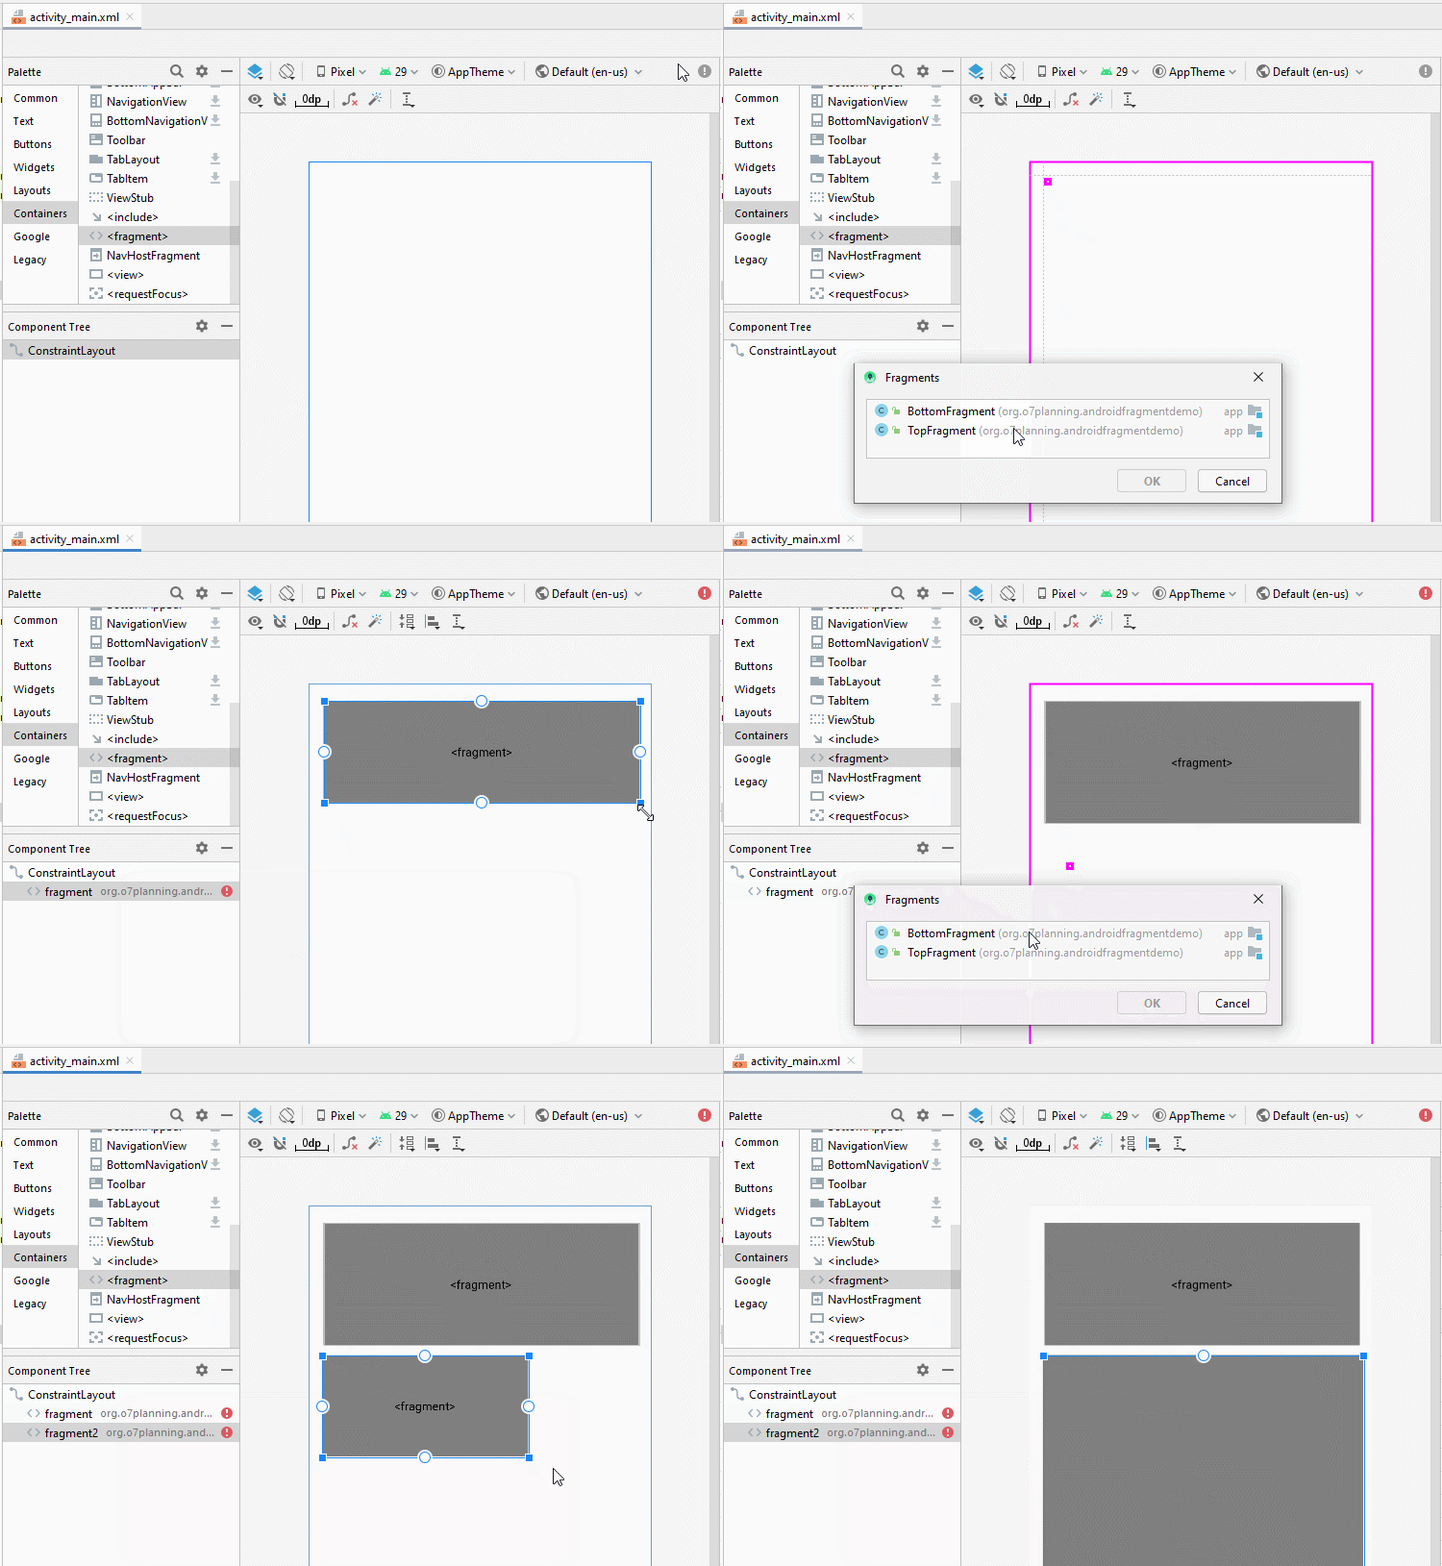
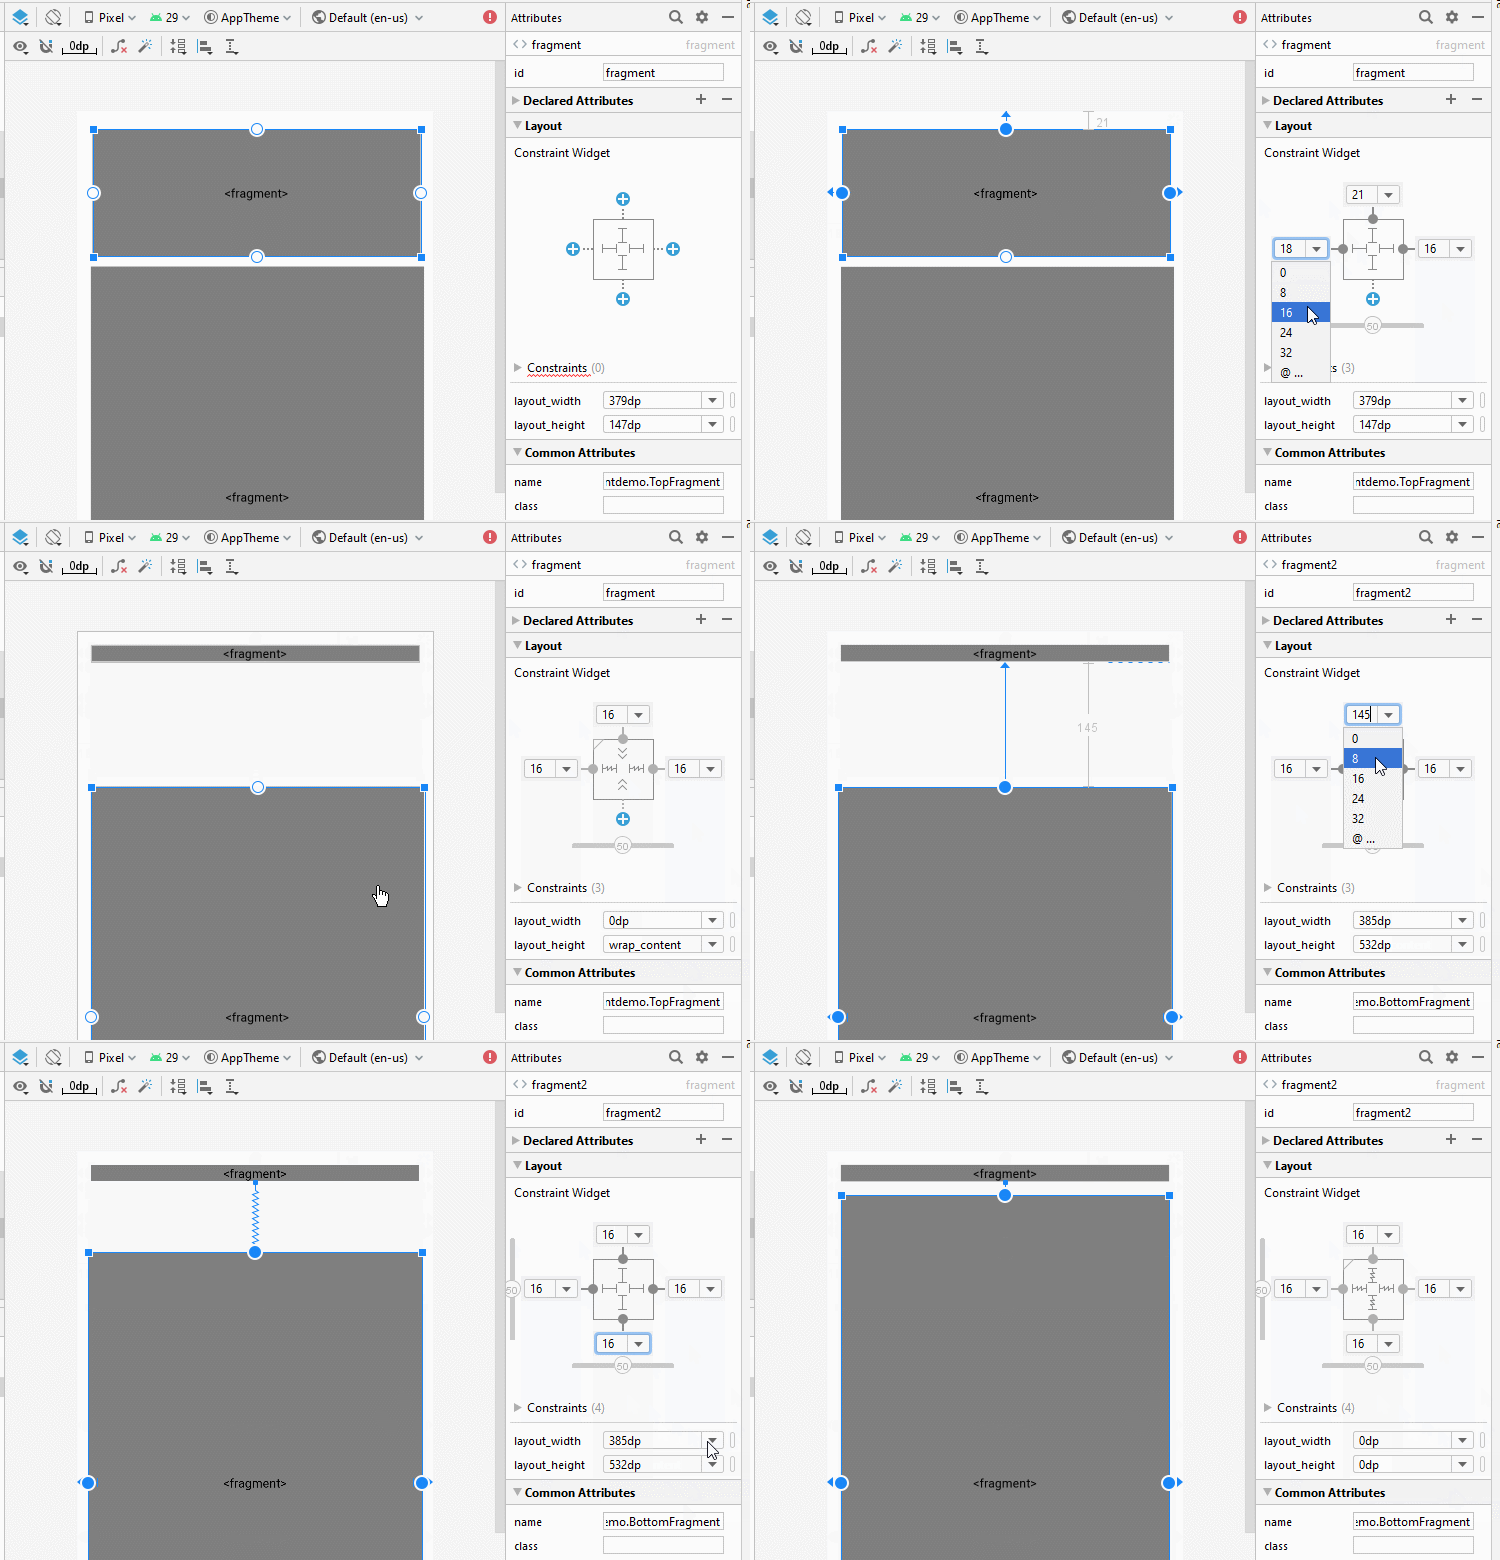
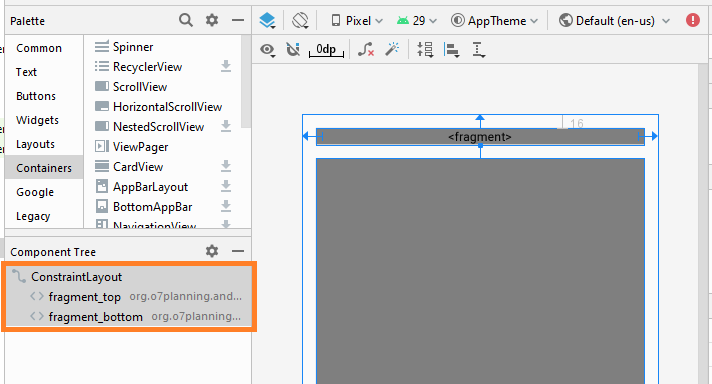
Set ID for fragments.
- fragment_top
- fragment_bottom
activity_main.xml
<?xml version="1.0" encoding="utf-8"?>
<androidx.constraintlayout.widget.ConstraintLayout
    xmlns:android="http://schemas.android.com/apk/res/android"
    xmlns:app="http://schemas.android.com/apk/res-auto"
    xmlns:tools="http://schemas.android.com/tools"
    android:layout_width="match_parent"
    android:layout_height="match_parent"
    tools:context=".MainActivity">

    <fragment
        android:id="@+id/fragment_top"
        android:name="org.o7planning.androidfragmentdemo.TopFragment"
        android:layout_width="0dp"
        android:layout_height="wrap_content"
        android:layout_marginStart="16dp"
        android:layout_marginLeft="16dp"
        android:layout_marginTop="16dp"
        android:layout_marginEnd="16dp"
        android:layout_marginRight="16dp"
        app:layout_constraintEnd_toEndOf="parent"
        app:layout_constraintStart_toStartOf="parent"
        app:layout_constraintTop_toTopOf="parent" />

    <fragment
        android:id="@+id/fragment_bottom"
        android:name="org.o7planning.androidfragmentdemo.BottomFragment"
        android:layout_width="0dp"
        android:layout_height="0dp"
        android:layout_marginStart="16dp"
        android:layout_marginLeft="16dp"
        android:layout_marginTop="16dp"
        android:layout_marginEnd="16dp"
        android:layout_marginRight="16dp"
        android:layout_marginBottom="16dp"
        app:layout_constraintBottom_toBottomOf="parent"
        app:layout_constraintEnd_toEndOf="parent"
        app:layout_constraintStart_toStartOf="parent"
        app:layout_constraintTop_toBottomOf="@+id/fragment_top" />
</androidx.constraintlayout.widget.ConstraintLayout>
MainActivity.java
package org.o7planning.androidfragmentdemo;

import androidx.appcompat.app.AppCompatActivity;

import android.os.Bundle;

public class MainActivity extends AppCompatActivity {

    @Override
    protected void onCreate(Bundle savedInstanceState) {
        super.onCreate(savedInstanceState);
        setContentView(R.layout.activity_main);
    }

    public void showText(String topImageText, String bottomImageText) {
        BottomFragment bottomFragment
                = (BottomFragment) this.getSupportFragmentManager()
                .findFragmentById(R.id.fragment_bottom);
        bottomFragment.showText(topImageText, bottomImageText);
    }

}
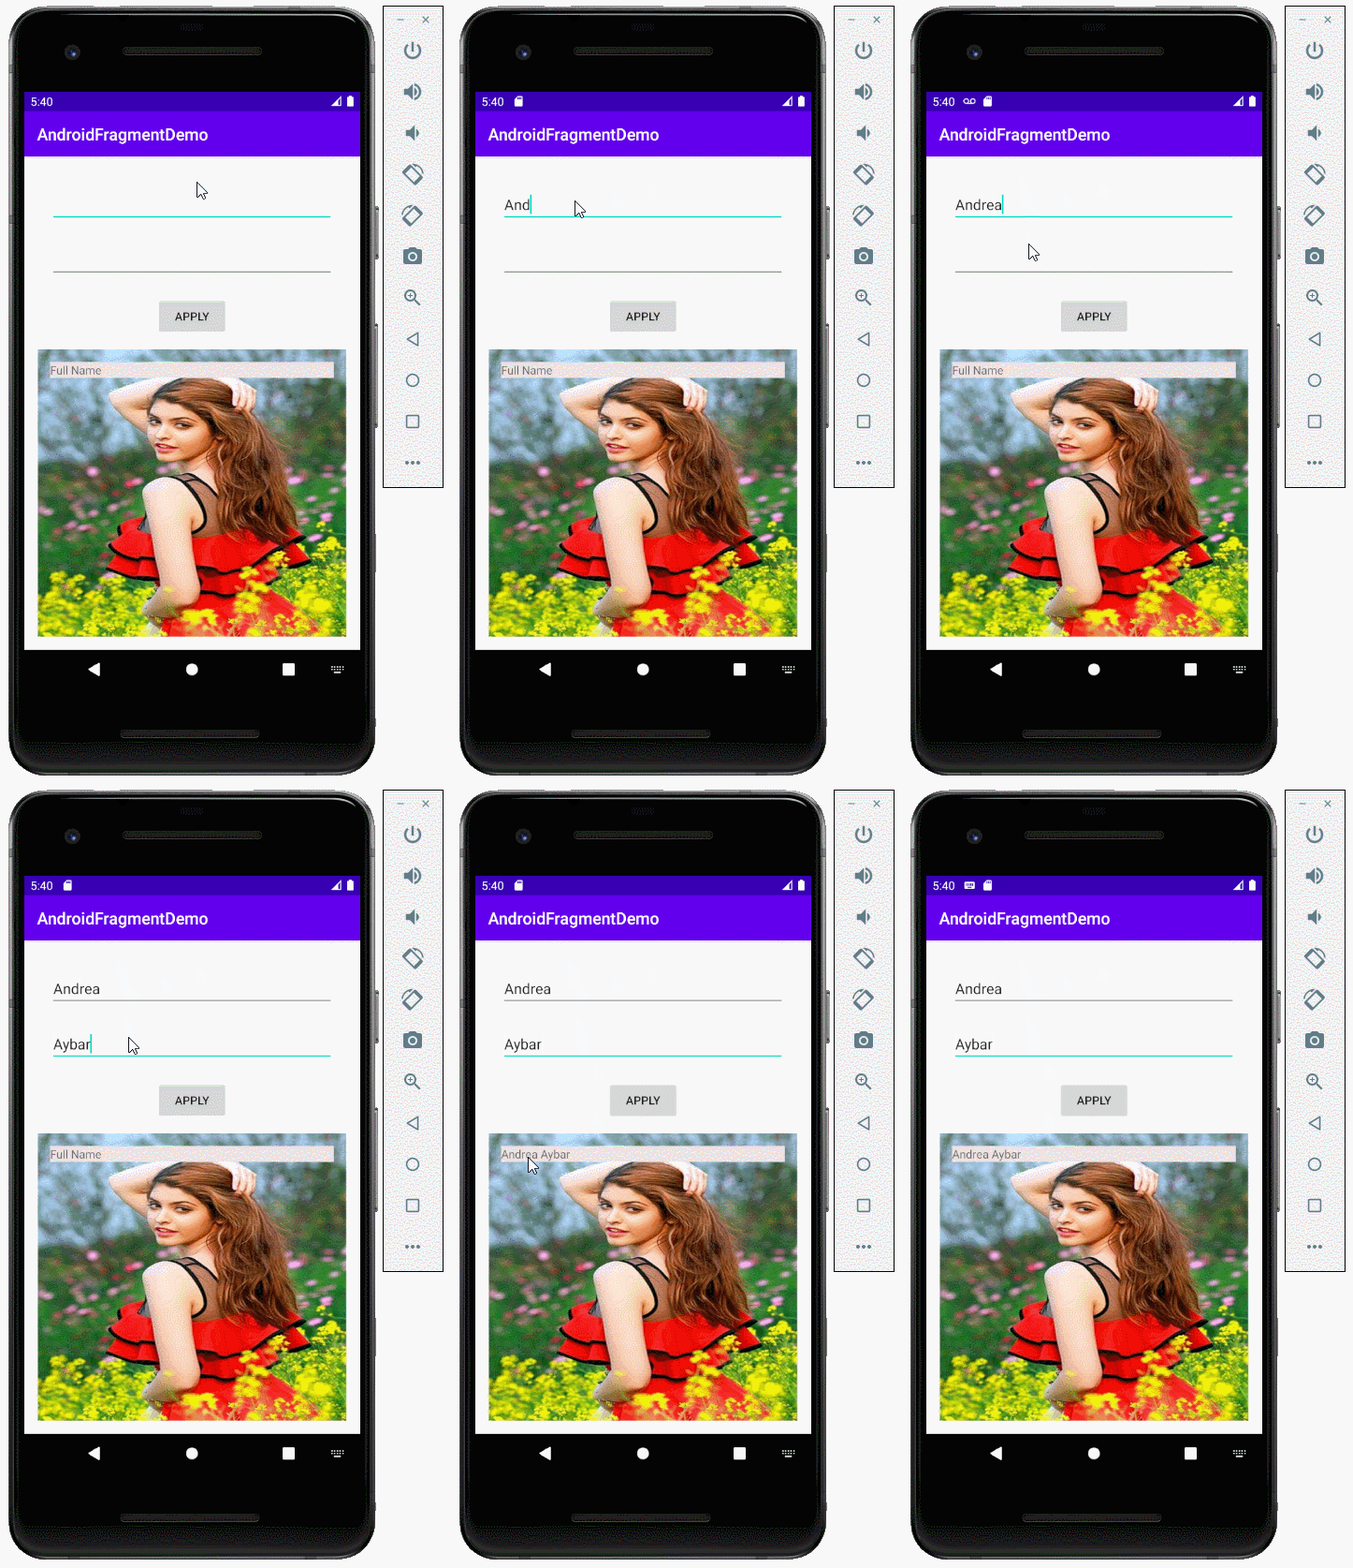
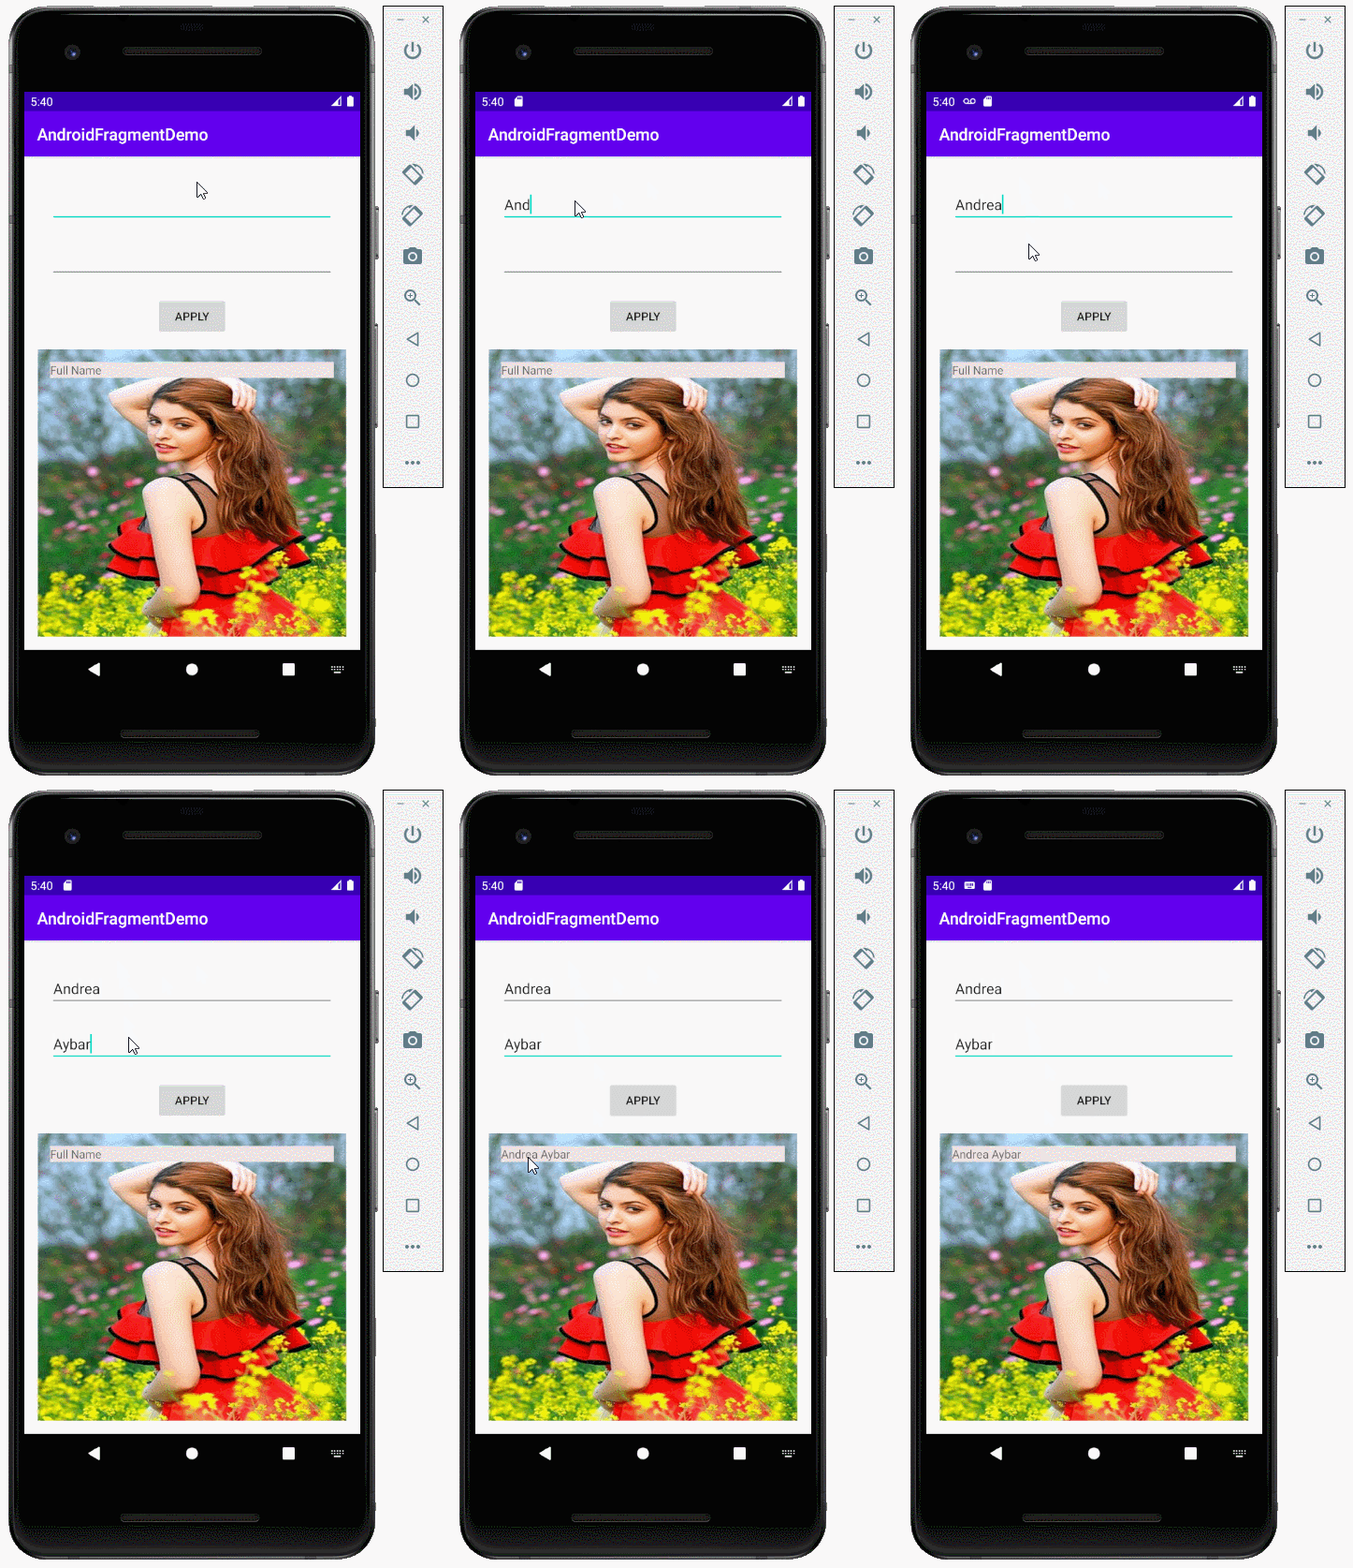
Running Apps:
No ADS
Android Programming Tutorials
- Format Credit Card Number with Android TextWatcher
- Android Networking Tutorial with Examples
- Android TextInputLayout Tutorial with Examples
- Create a simple File Finder Dialog in Android
- Android AutoCompleteTextView and MultiAutoCompleteTextView Tutorial with Examples
- Using image assets and icon assets of Android Studio
- Android AsyncTaskLoader Tutorial with Examples
- Android ImageSwitcher Tutorial with Examples
- Android TimePickerDialog Tutorial with Examples
- Android FrameLayout Tutorial with Examples
- Android TimePicker Tutorial with Examples
- How to disable the permissions already granted to the Android application?
- Android ContextMenu Tutorial with Examples
- Android Camera Tutorial with Examples
- Get Phone Number in Android using TelephonyManager
- Android Clipboard Tutorial with Examples
- Android DatePickerDialog Tutorial with Examples
- Android SMS Tutorial with Examples
- Android Space Tutorial with Examples
- Android ScrollView and HorizontalScrollView Tutorial with Examples
- Install Android Studio on Windows
- Android VideoView Tutorial with Examples
- Android ProgressBar Tutorial with Examples
- Android External Storage Tutorial with Examples
- Android 2D Game Tutorial for Beginners
- Enable USB Debugging on Android Device
- Android MediaPlayer Tutorial with Examples
- Android Phone Call Tutorial with Examples
- Example of an explicit Android Intent, calling another Intent
- Android TextWatcher Tutorial with Examples
- Configure Android Emulator in Android Studio
- Android PopupMenu Tutorial with Examples
- Android CharacterPickerDialog Tutorial with Examples
- Android ListView with Checkbox using ArrayAdapter
- Android RadioGroup and RadioButton Tutorial with Examples
- Android AsyncTask Tutorial with Examples
- Android SnackBar Tutorial with Examples
- Android Spinner Tutorial with Examples
- Android ListView Tutorial with Examples
- Android TextView Tutorial with Examples
- Android SeekBar Tutorial with Examples
- Android JSON Parser Tutorial with Examples
- How to know the phone number of Android Emulator and change it
- Android LinearLayout Tutorial with Examples
- Android ViewPager2 Tutorial with Examples
- Android Text to Speech Tutorial with Examples
- Android RatingBar Tutorial with Examples
- Android DialogFragment Tutorial with Examples
- Android Wifi Scanning Tutorial with Examples
- Android Fragments Tutorial with Examples
- Create a simple File Chooser in Android
- Android DatePicker Tutorial with Examples
- Example of implicit Android Intent, open a URL, send an email
- Using Android Device File Explorer
- Android ToggleButton Tutorial with Examples
- Google Maps Android API Tutorial with Examples
- How to add external libraries to Android Project in Android Studio?
- Android EditText Tutorial with Examples
- Android ImageButton Tutorial with Examples
- Android Notifications Tutorial with Examples
- Android CheckBox Tutorial with Examples
- Android Services Tutorial with Examples
- Android Dialog Tutorial with Examples
- Android Tutorial for Beginners - Basic examples
- Create a custom Android Toast
- Android Intents Tutorial with Examples
- Android WebView Tutorial with Examples
- Android Chip and ChipGroup Tutorial with Examples
- Android GridView Tutorial with Examples
- Android Switch Tutorial with Examples
- How to remove applications from Android Emulator?
- Android QuickContactBadge Tutorial with Examples
- Android Chronometer Tutorial with Examples
- Android OptionMenu Tutorial with Examples
- Install Intel® HAXM for Android Studio
- Playing Sound effects in Android with SoundPool
- Android Internal Storage Tutorial with Examples
- Android AlertDialog Tutorial with Examples
- Android SharedPreferences Tutorial with Examples
- ChipGroup and Chip Entry Example
- Android SQLite Database Tutorial with Examples
- Android Toast Tutorial with Examples
- Android TableLayout Tutorial with Examples
- Android Button Tutorial with Examples
- Android FloatingActionButton Tutorial with Examples
- What is needed to get started with Android?
- Android UI Layouts Tutorial with Examples
- Android CardView Tutorial with Examples
- Setting SD Card for Android Emulator
- Android ImageView Tutorial with Examples
- Android Tutorial for Beginners - Hello Android
- Android StackView Tutorial with Examples
- Android TextClock Tutorial with Examples
Show More


