Android Internal Storage Tutorial with Examples
1. Android Internal Storage
No ADS
Android Internal Storage: A place to store private data of each application, this data is stored and used for own application. Other applications can not access it. Normally when the application is removed from Android devices, the associated data file is also removed.
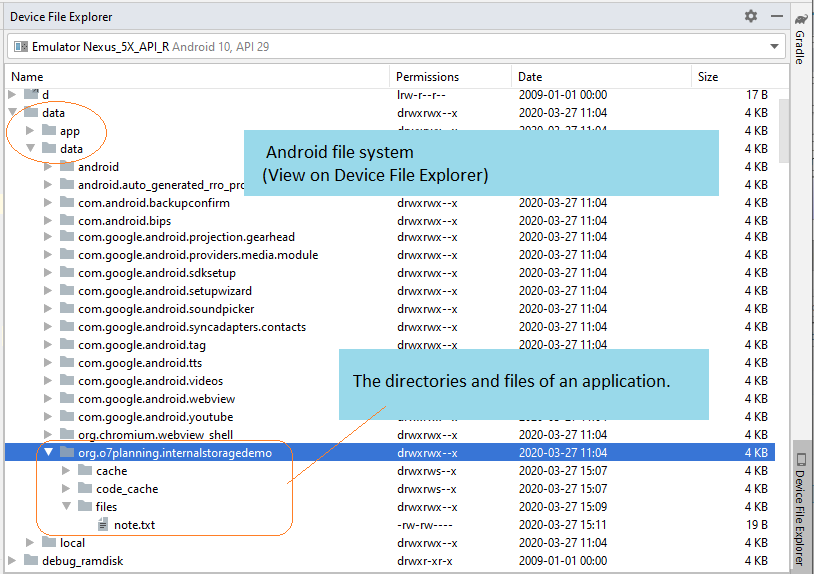
Another feature when you work with files in Internal Storage, you can only work with a simple file name, can not work with a file name has the path.
Open file to write:
// Is a simple file name.
// Note!! Do not allow the path.
String simpleFileName ="note.txt";


// Open Stream to write file.
FileOutputStream out = openFileOutput(simpleFileName, MODE_PRIVATE);
You have four option for creating mode:
Mode | Description |
MODE_PRIVATE | File creation mode: the default mode, where the created file can only be accessed by the calling application (or all applications sharing the same user ID). |
MODE_APPEND | Mode data appended to the file if it already exists. |
MODE_ENABLE_WRITE_AHEAD_LOGGING | |
These modes are very dangerous, it's like a security hole in Android, best not to use, you can use alternative techniques such as:
| |
These modes are very dangerous, it's like a security hole in Android, best not to use, you can use alternative techniques such as:
| |
This mode allows multiple processes can be writen to the file. However, it is recommended that you should not use this mode because it does not work on some versions of Android. You can use other techniques:
|
Open file to read data:
// Is a simple file name.
// Note!! Do not allow the path.
String simpleFileName = "note.txt";

// Open stream to read file.
FileInputStream in = this.openFileInput(simpleFileName);
2. Reading and writing data to Internal Storage example
No ADS
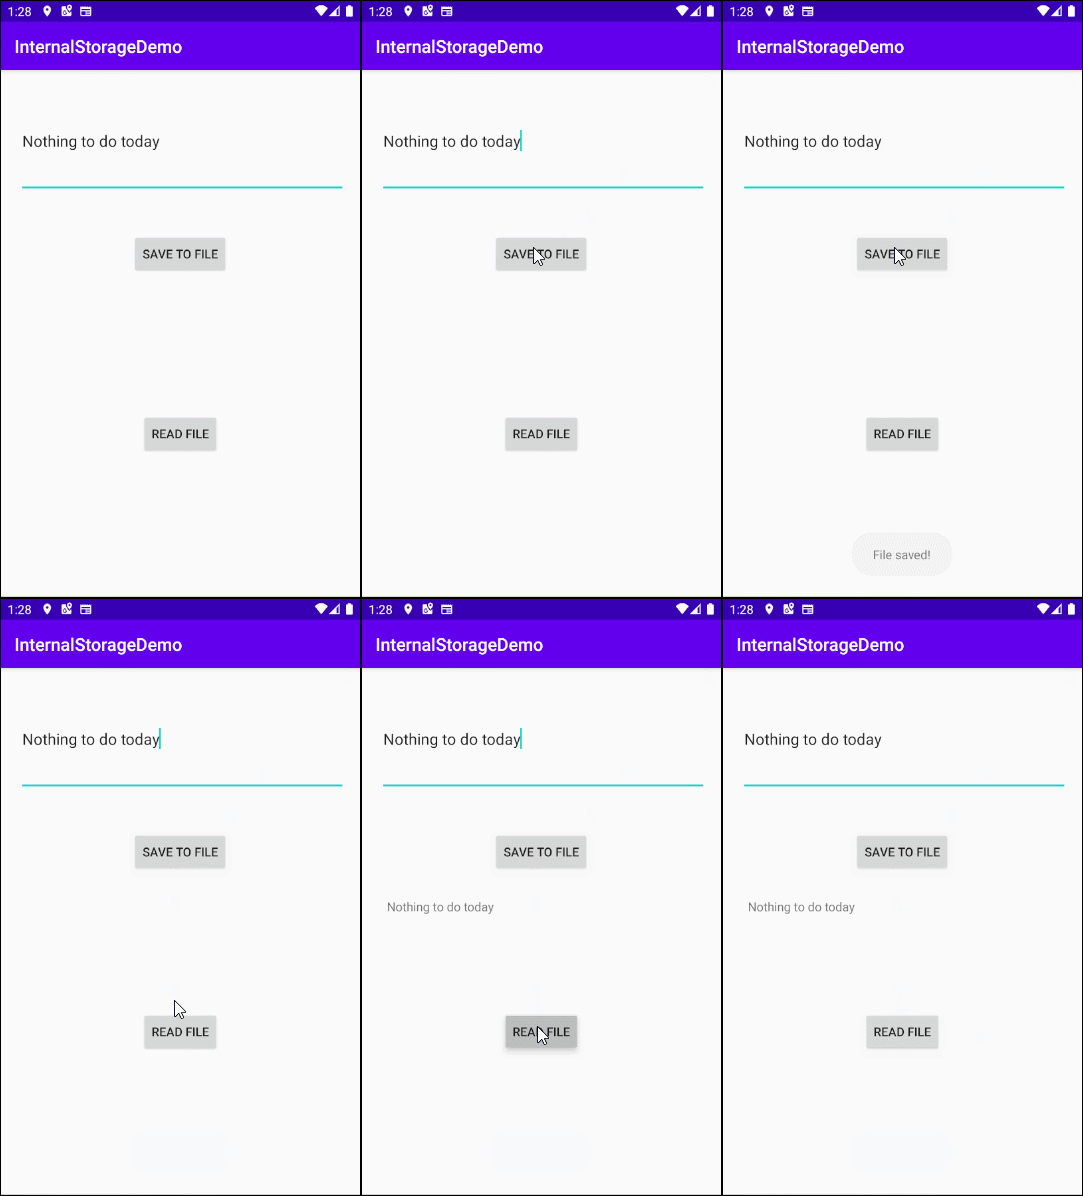
Now you can make an example of writing data to files stored in Internal Storage, and read data from this file.
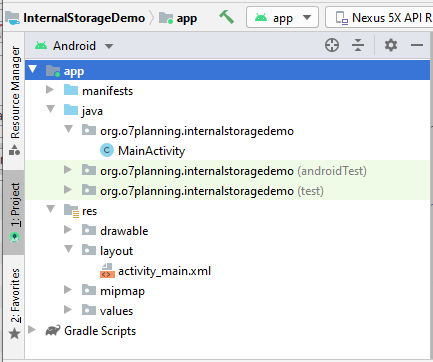
Create a project named InternalStorageDemo.
- File > New > New Project > Empty Activity
- Name: InternalStorageDemo
- Package name: org.o7planning.internalstoragedemo
- Language: Java
The application interface:
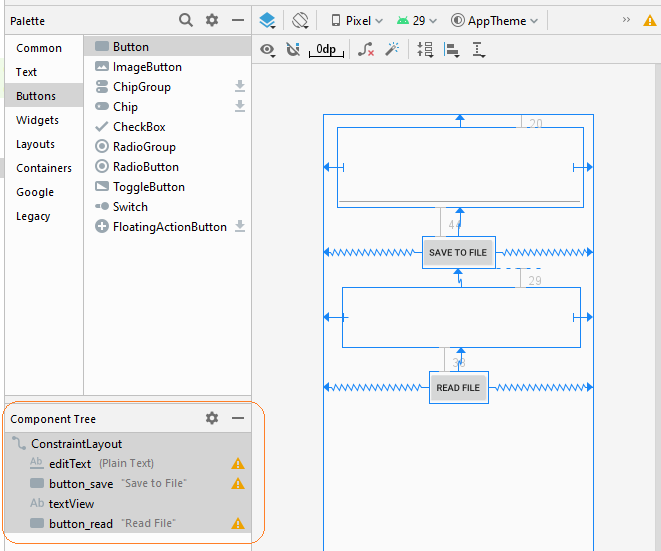
The interface of this application is very simple, if you are interested in the steps to create it, see the appendix at the end of the article.
activity_main.xml
<?xml version="1.0" encoding="utf-8"?>
<androidx.constraintlayout.widget.ConstraintLayout
    xmlns:android="http://schemas.android.com/apk/res/android"
    xmlns:app="http://schemas.android.com/apk/res-auto"
    xmlns:tools="http://schemas.android.com/tools"
    android:layout_width="match_parent"
    android:layout_height="match_parent"
    tools:context=".MainActivity">

    <EditText
        android:id="@+id/editText"
        android:layout_width="0dp"
        android:layout_height="122dp"
        android:layout_marginStart="21dp"
        android:layout_marginLeft="21dp"
        android:layout_marginTop="20dp"
        android:layout_marginEnd="16dp"
        android:layout_marginRight="16dp"
        android:ems="10"
        android:inputType="textPersonName"
        app:layout_constraintEnd_toEndOf="parent"
        app:layout_constraintStart_toStartOf="parent"
        app:layout_constraintTop_toTopOf="parent" />

    <Button
        android:id="@+id/button_save"
        android:layout_width="wrap_content"
        android:layout_height="wrap_content"
        android:layout_marginTop="44dp"
        android:text="Save to File"
        app:layout_constraintEnd_toEndOf="parent"
        app:layout_constraintStart_toStartOf="parent"
        app:layout_constraintTop_toBottomOf="@+id/editText" />

    <TextView
        android:id="@+id/textView"
        android:layout_width="0dp"
        android:layout_height="91dp"
        android:layout_marginStart="29dp"
        android:layout_marginLeft="29dp"
        android:layout_marginTop="29dp"
        android:layout_marginEnd="21dp"
        android:layout_marginRight="21dp"
        app:layout_constraintEnd_toEndOf="parent"
        app:layout_constraintStart_toStartOf="parent"
        app:layout_constraintTop_toBottomOf="@+id/button_save" />

    <Button
        android:id="@+id/button_read"
        android:layout_width="wrap_content"
        android:layout_height="wrap_content"
        android:layout_marginTop="38dp"
        android:text="Read File"
        app:layout_constraintEnd_toEndOf="parent"
        app:layout_constraintStart_toStartOf="parent"
        app:layout_constraintTop_toBottomOf="@+id/textView" />
</androidx.constraintlayout.widget.ConstraintLayout>
MainActivity.java
package org.o7planning.internalstoragedemo;

import android.os.Bundle;
import androidx.appcompat.app.AppCompatActivity;
import android.view.View;
import android.widget.Button;
import android.widget.EditText;
import android.widget.TextView;
import android.widget.Toast;

import java.io.BufferedReader;
import java.io.FileInputStream;
import java.io.FileOutputStream;
import java.io.InputStreamReader;

public class MainActivity extends AppCompatActivity {

    private Button saveButton;
    private Button readButton;

    private TextView textView;
    private EditText editText;

    // Is a simple file name.
    // Note!! Do not allow the path.
    private String simpleFileName = "note.txt";

    @Override
    protected void onCreate(Bundle savedInstanceState) {
        super.onCreate(savedInstanceState);
        setContentView(R.layout.activity_main);

        this.saveButton = (Button) this.findViewById(R.id.button_save);
        this.readButton = (Button) this.findViewById(R.id.button_read);
        this.textView = (TextView) this.findViewById(R.id.textView);
        this.editText = (EditText) this.findViewById(R.id.editText);

        this.saveButton.setOnClickListener(new Button.OnClickListener() {

            @Override
            public void onClick(View v) {
                saveData();
            }
        });

        this.readButton.setOnClickListener(new Button.OnClickListener() {

            @Override
            public void onClick(View v) {
                readData();
            }
        });
    }


    private void saveData() {
        String data = this.editText.getText().toString();
        try {
            // Open Stream to write file.
            FileOutputStream out = this.openFileOutput(simpleFileName, MODE_PRIVATE);
            // Ghi dữ liệu.
            out.write(data.getBytes());
            out.close();
            Toast.makeText(this,"File saved!",Toast.LENGTH_SHORT).show();
        } catch (Exception e) {
            Toast.makeText(this,"Error:"+ e.getMessage(),Toast.LENGTH_SHORT).show();
        }
    }

    private void readData() {
        try {
            // Open stream to read file.
            FileInputStream in = this.openFileInput(simpleFileName);

            BufferedReader br= new BufferedReader(new InputStreamReader(in));

            StringBuilder sb= new StringBuilder();
            String s= null;
            while((s= br.readLine())!= null)  {
                sb.append(s).append("\n");
            }
            this.textView.setText(sb.toString());

        } catch (Exception e) {
            Toast.makeText(this,"Error:"+ e.getMessage(),Toast.LENGTH_SHORT).show();
        }
    }

}
Use the "Android Device Manager" you can see the file is created.
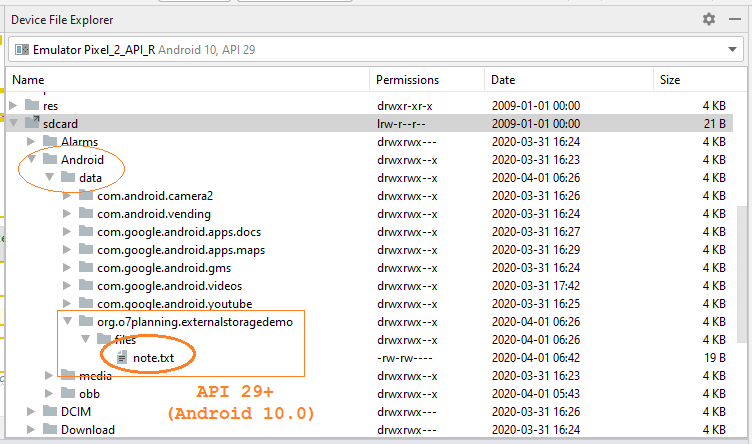
See more about "Device File Explorer":
No ADS
Android Programming Tutorials
- Format Credit Card Number with Android TextWatcher
- Android Networking Tutorial with Examples
- Android TextInputLayout Tutorial with Examples
- Create a simple File Finder Dialog in Android
- Android AutoCompleteTextView and MultiAutoCompleteTextView Tutorial with Examples
- Using image assets and icon assets of Android Studio
- Android AsyncTaskLoader Tutorial with Examples
- Android ImageSwitcher Tutorial with Examples
- Android TimePickerDialog Tutorial with Examples
- Android FrameLayout Tutorial with Examples
- Android TimePicker Tutorial with Examples
- How to disable the permissions already granted to the Android application?
- Android ContextMenu Tutorial with Examples
- Android Camera Tutorial with Examples
- Get Phone Number in Android using TelephonyManager
- Android Clipboard Tutorial with Examples
- Android DatePickerDialog Tutorial with Examples
- Android SMS Tutorial with Examples
- Android Space Tutorial with Examples
- Android ScrollView and HorizontalScrollView Tutorial with Examples
- Install Android Studio on Windows
- Android VideoView Tutorial with Examples
- Android ProgressBar Tutorial with Examples
- Android External Storage Tutorial with Examples
- Android 2D Game Tutorial for Beginners
- Enable USB Debugging on Android Device
- Android MediaPlayer Tutorial with Examples
- Android Phone Call Tutorial with Examples
- Example of an explicit Android Intent, calling another Intent
- Android TextWatcher Tutorial with Examples
- Configure Android Emulator in Android Studio
- Android PopupMenu Tutorial with Examples
- Android CharacterPickerDialog Tutorial with Examples
- Android ListView with Checkbox using ArrayAdapter
- Android RadioGroup and RadioButton Tutorial with Examples
- Android AsyncTask Tutorial with Examples
- Android SnackBar Tutorial with Examples
- Android Spinner Tutorial with Examples
- Android ListView Tutorial with Examples
- Android TextView Tutorial with Examples
- Android SeekBar Tutorial with Examples
- Android JSON Parser Tutorial with Examples
- How to know the phone number of Android Emulator and change it
- Android LinearLayout Tutorial with Examples
- Android ViewPager2 Tutorial with Examples
- Android Text to Speech Tutorial with Examples
- Android RatingBar Tutorial with Examples
- Android DialogFragment Tutorial with Examples
- Android Wifi Scanning Tutorial with Examples
- Android Fragments Tutorial with Examples
- Create a simple File Chooser in Android
- Android DatePicker Tutorial with Examples
- Example of implicit Android Intent, open a URL, send an email
- Using Android Device File Explorer
- Android ToggleButton Tutorial with Examples
- Google Maps Android API Tutorial with Examples
- How to add external libraries to Android Project in Android Studio?
- Android EditText Tutorial with Examples
- Android ImageButton Tutorial with Examples
- Android Notifications Tutorial with Examples
- Android CheckBox Tutorial with Examples
- Android Services Tutorial with Examples
- Android Dialog Tutorial with Examples
- Android Tutorial for Beginners - Basic examples
- Create a custom Android Toast
- Android Intents Tutorial with Examples
- Android WebView Tutorial with Examples
- Android Chip and ChipGroup Tutorial with Examples
- Android GridView Tutorial with Examples
- Android Switch Tutorial with Examples
- How to remove applications from Android Emulator?
- Android QuickContactBadge Tutorial with Examples
- Android Chronometer Tutorial with Examples
- Android OptionMenu Tutorial with Examples
- Install Intel® HAXM for Android Studio
- Playing Sound effects in Android with SoundPool
- Android Internal Storage Tutorial with Examples
- Android AlertDialog Tutorial with Examples
- Android SharedPreferences Tutorial with Examples
- ChipGroup and Chip Entry Example
- Android SQLite Database Tutorial with Examples
- Android Toast Tutorial with Examples
- Android TableLayout Tutorial with Examples
- Android Button Tutorial with Examples
- Android FloatingActionButton Tutorial with Examples
- What is needed to get started with Android?
- Android UI Layouts Tutorial with Examples
- Android CardView Tutorial with Examples
- Setting SD Card for Android Emulator
- Android ImageView Tutorial with Examples
- Android Tutorial for Beginners - Hello Android
- Android StackView Tutorial with Examples
- Android TextClock Tutorial with Examples
Show More


