React-Transition-Group API Tutorial with Examples
1. What is React Transition?
No ADS
Before answering what the React Transition is? We will learn about what the "Transition" concept is.
OK,suppose you have a white background <div> element. When the user performs an action with this element, such as moving the cursor on its surface, the size of the <div> increases 2 times and the background color turns yellow.
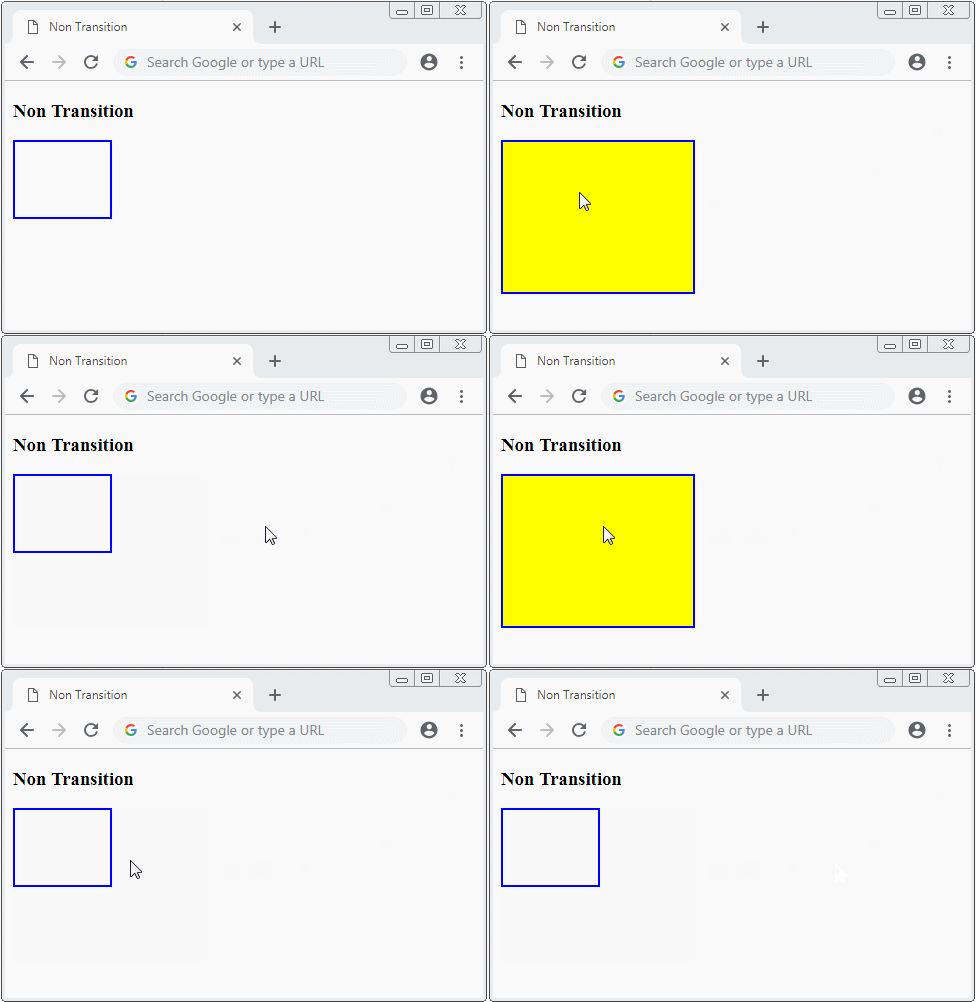
In fact, when the cursor moves on the surface of the <div>, the change happens immediately. While you want this change to take place slowly over a period of time. This is more interesting for users.
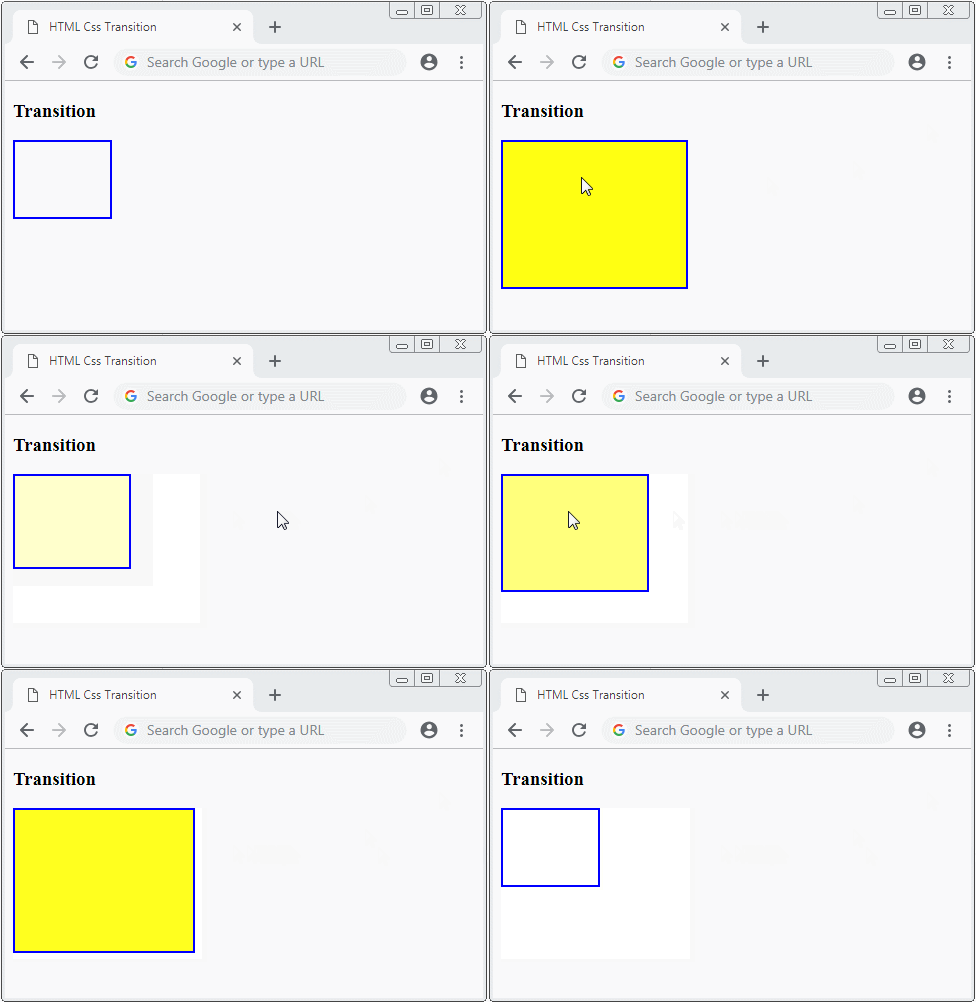
What I'm referring to is an animation effect that occurs during the transition. Most browsers support CSS3, and you can use CSS Transition to create such a transition.
React Transition
React-transition-group is a library developed by the community of React programmers, which provides the components necessary for use in the React application, helping you create animation effects during transition. It also helps you work with CSS Transition more easily.
This library provides the following components:
- Transition
- CssTransition
- TransitionGroup
For the React application in the NodeJS environment, you need to install the react-transition-group library:
# Install react-transition-group library:

npm install react-transition-group --save
For client-side React application:
<!--
   Check other version at: https://cdnjs.com/
-->

<script src="https://cdnjs.cloudflare.com/ajax/libs/react-transition-group/2.4.0/react-transition-group.min.js"></script>
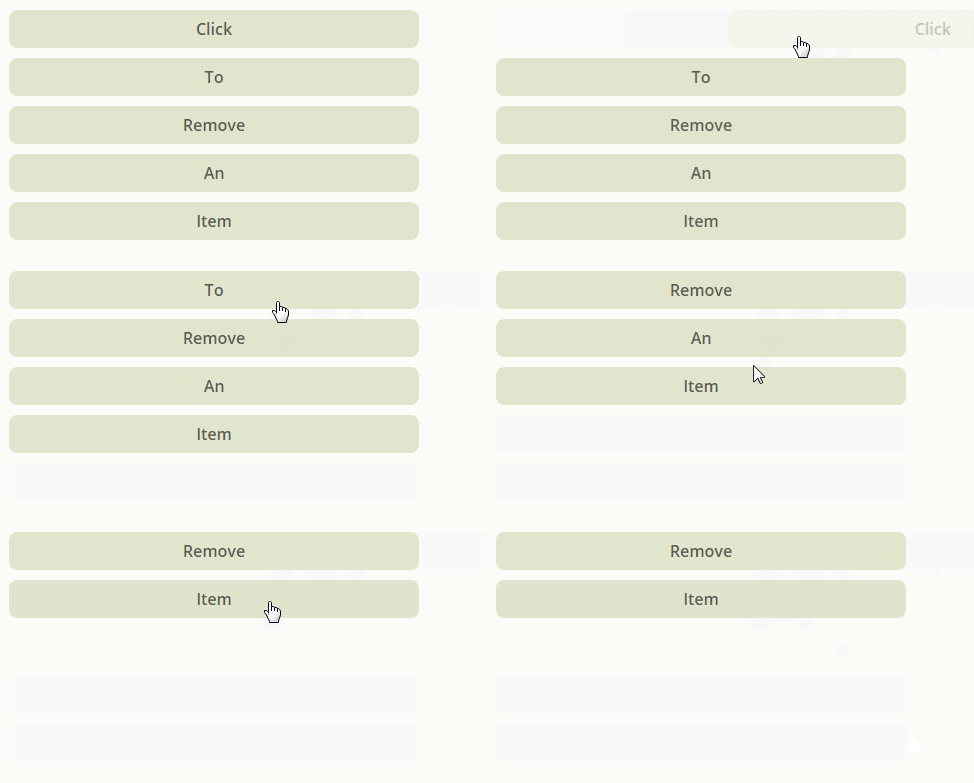
Below is an illustration of using React Transition to create effects in the React application:
2. Transition Component
No ADS
The Transition component allows you to describe a transition to convert from a interface status to new interface status in a period of time.
The Transition component contains only one direct child-element or function to return only one element.
// Contains only one direct child element
<ReactTransitionGroup.Transition ... >

    <MySingleElement>
       <MyOtherElements />
    </MySingleElement>

</ReactTransitionGroup.Transition>


// Contains a function, which returns a single element.
<ReactTransitionGroup.Transition ... >

  {(stateName) => { // stateName: 'entering', 'entered', 'exiting', 'exited'.
        return (
            <MySingleElement>
                <MyOtherElements />
            </MySingleElement>
        )
    }
  }

</ReactTransitionGroup.Transition>
** Transition Component **
<ReactTransitionGroup.Transition
     in = {true/false}

     unmountOnExit = {true/false}
     mountOnEnter = {true/false}

     appear = {true/false}
     enter = {true/false}
     exit = {true/false}

     timeout = {{ enter: 1500, exit: 2500 }}

     addEndListener = ..

     onEnter = ..
     onEntering = ..
     onEntered = ..
     onExit = ..
     onExiting = ..
     onExited = ..

     onFucus = ..
     onClick = ..
     ....
     >


</ReactTransitionGroup.Transition>
Callback functions:
- onEnter
- onEntering
- onEntered
- onExit
- onExiting
- onExited
props: in
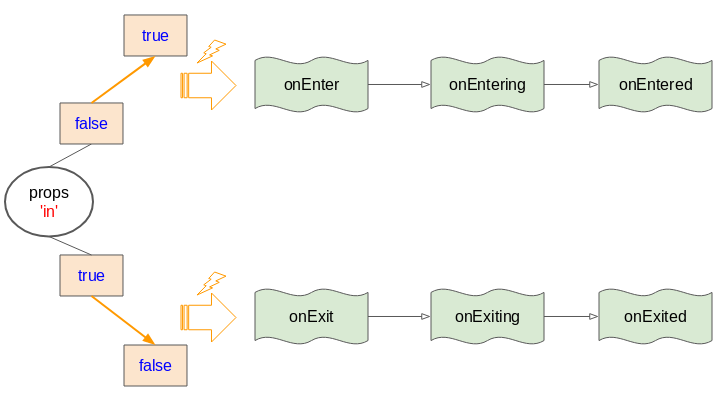
For the <Transition> component. 'in' is the most important props.
- Khi giá trị của 'in' chuyển từ true thành false nó sẽ phát ra (raise) lần lượt 3 sự kiện onEnter, onEntering, onEntered.
- Ngược lại, nếu giá trị của 'in' chuyển từ false thành true nó sẽ phát ra (raise) lần lượt 3 sự kiện onExit, onExiting, onExited.
props: timeout
props: timeout
<!-- Example 1 (enter = 1500, exit = 2500 ms) -->
<ReactTransitionGroup.Transition

     timeout = {{ enter: 1500, exit: 2500 }}

     ....
     >


</ReactTransitionGroup.Transition>


<!-- Example 2 (enter = exit = 1500 ms) -->
<ReactTransitionGroup.Transition

     timeout = 1500

     ....
     >


</ReactTransitionGroup.Transition>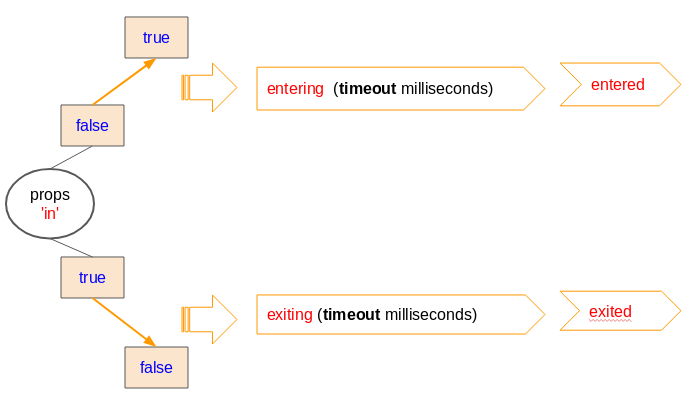
When the value of 'in' changes from false to true, the <Transition> component will turn into 'entering' status, and keeps unchanged in this status: 'timout' milisecond, and then it changes into the 'entered' status.
Inversely, when the value of 'in' changes from true to false. The <Transition> component will will turn into 'exiting', status, and keeps unchanged in this status: 'timout' milisecond, and then it changes into the 'exited' status.
props: enter
- type: boolean
- default: true
Enable or disable 'enter' transition.
props: exit
- type: boolean
- default: true
Enable or disable 'exit' transition.
props: mountOnEnter
- type: boolean
- default: false
<ReactTransitionGroup.Transition  mountOnEnter = {true/false}>

    <!-- Child Component -->
    <MySingleElement>
       <MyOtherElements />
    </MySingleElement>

</ReactTransitionGroup.Transition>
By default, the <Transition> child element is mounted to the <Transition> parent element immediately, therefore, it will display to users. But if you want that child element is mounted lazily , please use the props: mountOnEnter.
<Transition mountOnEnter = {true}>: means that child element will be mounted with <Transition> when the status of <Transition> is 'entered'.
props: unmountOnExit
- type: boolean
- default: false
<ReactTransitionGroup.Transition  unmountOnExit = {true/false} >

    <!-- Child Component -->
    <MySingleElement>
       <MyOtherElements />
    </MySingleElement>

</ReactTransitionGroup.Transition>
<Transition unmountOnExit={true}> : means when the <Transition> component changes to the 'exited' status, it will unmount all its sub-components. It means that the sub-component of <Transition> will be eliminated.
props: appear
- TODO
addEndListener
Allow you to add a custom function to the middle of process of transition, like the following illustration:
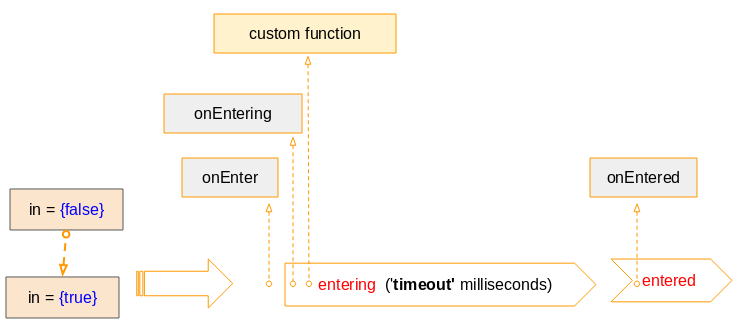
-
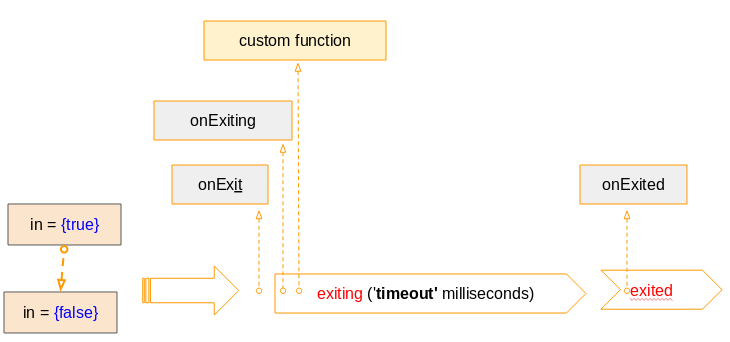
// Example:

addEndListener={(node, done) => {
  console.log(node);
  console.log(done);

  // Use the css 'transitionend' event to mark the finish of a transition
  // @see more: https://developer.mozilla.org/en-US/docs/Web/Events/transitionend
  node.addEventListener('transitionend', done, false);
}}


// See on Console Log:
// console.log(done):
ƒ (event) {
   if (active) {
        active = false;
        _this4.nextCallback = null;
        callback(event);
   }
}
3. CSSTransition Component
No ADS
In fact, you need the <Transition> component to do everything with transition. But you can need the <CSSTransition> component in some cases because it supports you to work easily with the CSS Transition.
The <CSSTransition> component has all props like the <Transition> component and has other additional props such as classNames.
** CSSTransition Component **
<ReactTransitionGroup.CSSTransition
     in = ..

     classNames = "yourClassNamePrefix"

     unmountOnExit
     mountOnEnter

     timeout = {{ enter: 1500, exit: 2500 }}

     onEnter = ..
     onEntering = ..
     onEntered = ..
     onExit = ..
     onExiting = ..
     onExited = ..

     onFucus = ..
     onClick = ..
     ....
     >


</ReactTransitionGroup.CSSTransition>props: "classNames" is the difference between <CSSTransition> component and <Transition> component.
When the value of props: 'in' changes from false to true, <CSSTransition> will change to the 'entering' status and keep in this status in 'timeout' miliseconds, before changing to the 'entered' status. During such process, the CSS classes will be applied to the sub-components of <CSSTransition>, like the following illustration:

When the value of props: 'in' changes from false to true, <CSSTransition> will change to the 'exiting', status and keep in this status in 'timeout' miliseconds, before changing to the 'exited'status. During such process, the CSS classes will be applied to the sub-components of <CSSTransition>, like the following illustration:

props: 'classNames' can also get value as an object:
classNames={{
   appear: 'my-appear',
   appearActive: 'my-active-appear',
   enter: 'my-enter',
   enterActive: 'my-active-enter',
   enterDone: 'my-done-enter,
   exit: 'my-exit',
   exitActive: 'my-active-exit',
   exitDone: 'my-done-exit,
}}
4. TransitionGroup Component
The <TransitionGroup> component manages a collection of <Transitions> (or <CSSTransition>) in a list, also like <Transition> & <CSSTransition>, <TransitionGroup> helping to manage mounting & unmounting the components over time.
<ReactTransitionGroup.TransitionGroup
  appear = {true/false}

  enter = {true/false}
  exit = {true/false}

  childFactory = {a function}
  >

  ....

</ReactTransitionGroup.TransitionGroup>
No ADS
ReactJS Tutorials
- ReactJS props and state Tutorial with Examples
- ReactJS Events Tutorial with Examples
- ReactJS Component API Tutorial with Examples
- ReactJs component Lifecycle methods
- ReactJS Refs Tutorial with Examples
- ReactJS Lists and Keys Tutorial with Examples
- ReactJS Forms Tutorial with Examples
- Undertanding ReactJS Router with example on the client side
- Introduction to Redux
- Simple example with React and Redux on the client side
- React-Transition-Group API Tutorial with Examples
- Quickstart with ReactJS in NodeJS Environment
- Undertanding ReactJS Router with a basic example (NodeJS)
- React-Transition-Group Transition Example (NodeJS)
- React-Transition-Group CSSTransition Example (NodeJS)
- Introduction to ReactJS
- Install React Plugin for Atom Editor
- Create a Simple HTTP Server with NodeJS
- Quickstart with ReactJS - Hello ReactJS
Show More