Install OpenJDK on Ubuntu
1. Which version should you install?
OpenJDK is an open source code of the Java (Java Development Kit) maintained and developed by Oracle and the community. OpenJDK has similar features as Oracle JDK.
You may find them interesting:
Until 2020, Oracle has released Java 13, but there are only a few long-term supported versions, Java 8, 11, 13. Therefore, you can use one of these versions rather than other versions which are no longer supported by Oracle and there are very few users nowadays.
Java 8, despite being released in March 2014, still has a large number of users today, due to its long-term Oracle support, and its stability.
2. Installing OpenJDK 8
No ADS
Installing OpenJDK 8 is extremely simple. On Ubuntu, open Terminal and execute some commands as follows:
sudo apt updateWith OpenJDK version 8, 9:
# Install OpenJDK 8:

sudo apt install openjdk-8-jdk

# Install OpenJDK 9:

sudo apt install openjdk-9-jdk
Then check the result of the installation:
java -version3. Installing OpenJDK 11
No ADS
Installing OpenJDK 11 is a bit more complicated than OpenJDK 8 because you need to download and install it.
Download OpenJDK 11:
wget https://download.java.net/java/ga/jdk11/openjdk-11_linux-x64_bin.tar.gzNext, extract the file that you have just downloaded in the previous step.
tar xzvf openjdk-11_linux-x64_bin.tar.gzAfter that, move the folder you have got after extracting to /usr/lib/jvm folder.
# Create directory:

sudo mkdir /usr/lib/jvm

# Move:

sudo mv jdk-11 /usr/lib/jvm/openjdk-11-manual-installation/
Finally, you need to make sure that the java & javac commands are pointing to the right location.
sudo update-alternatives --install /usr/bin/java java /usr/lib/jvm/openjdk-11-manual-installation/bin/java 1

sudo update-alternatives --install /usr/bin/javac javac /usr/lib/jvm/openjdk-11-manual-installation/bin/javac 1

# keytool (Optional)

sudo update-alternatives --install /usr/bin/keytool keytool /usr/lib/jvm/openjdk-11-manual-installation/bin/keytool 1
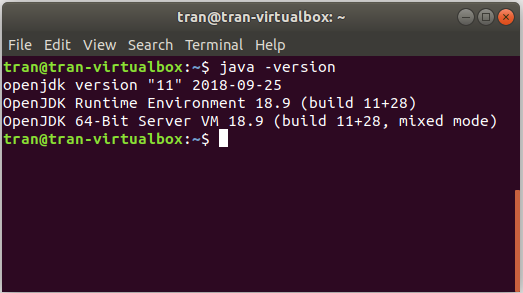
Now check what you installed:
java -version
4. Installing OpenJDK 13
No ADS
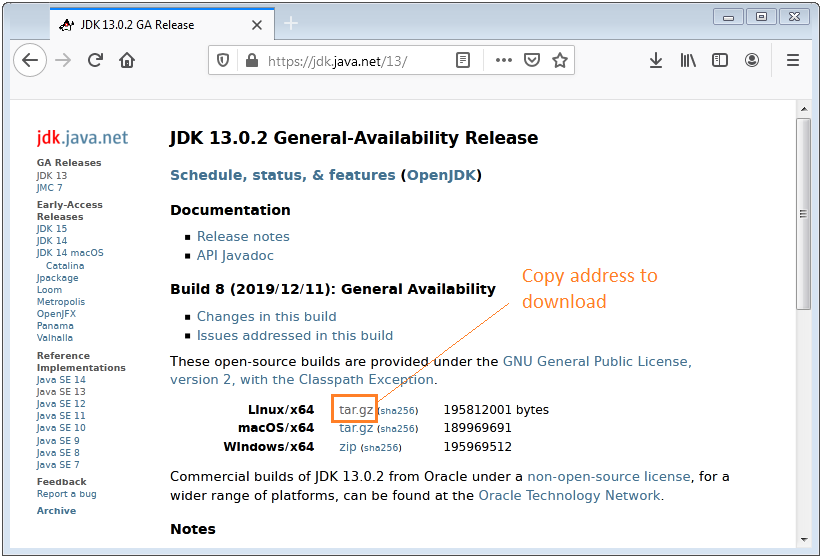
First of all, you need an address to download OpenJDK 13:

You will have an address to download OpenJDK similar below:
https://download.java.net/java/GA/jdk13.0.2/d4173c853231432d94f001e99d882ca7/8/GPL/openjdk-13.0.2_linux-x64_bin.tar.gz
Next, use the command to download it:
wget https://download.java.net/java/GA/jdk13.0.2/d4173c853231432d94f001e99d882ca7/8/GPL/openjdk-13.0.2_linux-x64_bin.tar.gzAfter that, extract the file you have just downloaded in the previous step.
tar xzvf openjdk-13.0.2_linux-x64_bin.tar.gzThen move the folder you have got after extracting to /usr/lib/jvm folder.
# Create directory:

sudo mkdir /usr/lib/jvm

# Move:

sudo mv jdk-13.0.2   /usr/lib/jvm/openjdk-13-manual-installation/
Finally, you need to make sure that the java & javac commands are pointing to the right location.
sudo update-alternatives --install /usr/bin/java java /usr/lib/jvm/openjdk-13-manual-installation/bin/java 1

sudo update-alternatives --install /usr/bin/javac javac /usr/lib/jvm/openjdk-13-manual-installation/bin/javac 1

# keytool (Optional):

sudo update-alternatives --install /usr/bin/keytool keytool /usr/lib/jvm/openjdk-13-manual-installation/bin/keytool 1
Let's check the installation result:
java -version5. Set Default Version
If you have multiple versions of JDK installed on your operating system, you need to specify a default version.
Check to see which versions of JDK are installed on your computer:
sudo update-alternatives --config javaYou will get similar results as follows, enter 1 (or 2, ...) to select the default version you would like to use.
sudo update-alternatives --config java There are 2 choices for the alternative java (providing /usr/bin/java). Selection Path Priority Status ------------------------------------------------------------ * 0/usr/lib/jvm/openjdk-11-manual-installation/bin/java1111 auto mode 1/usr/lib/jvm/openjdk-11-manual-installation/bin/java1111 manual mode 2/usr/lib/jvm/openjdk-13-manual-installation/bin/java1081 manual mode Press to keep the current choice[*], or type selection number:
Finally, set the JAVA_HOME environment variable:
export JAVA_HOME=/usr/lib/jvm/openjdk-13-manual-installation/bin/javaNow check the result of setting the environment variable:
echo $JAVA_HOMENo ADS
Java Basic
- Data Types in java
- Java PhantomReference Tutorial with Examples
- JDK Javadoc in CHM format
- Java Stream Tutorial with Examples
- Java Predicate Tutorial with Examples
- Java BiConsumer Tutorial with Examples
- Arrays in Java
- JDBC Driver Libraries for different types of database in Java
- Abstract class and Interface in Java
- Java Commons Email Tutorial with Examples
- Install Eclipse
- Bitwise Operations
- Install Eclipse on Ubuntu
- Configuring Eclipse to use the JDK instead of JRE
- Java Commons Logging Tutorial with Examples
- Java Enums Tutorial with Examples
- Loops in Java
- Java Regular Expressions Tutorial with Examples
- Install Java on Ubuntu
- Quick Learning Java for beginners
- Install Java on Windows
- Comparing and Sorting in Java
- Inheritance and polymorphism in Java
- Java Consumer Tutorial with Examples
- Java String, StringBuffer and StringBuilder Tutorial with Examples
- Java Exception Handling Tutorial with Examples
- Example of Java encoding and decoding using Apache Base64
- if else statement in java
- Switch Statement in Java
- Java Supplier Tutorial with Examples
- Java Programming for team using Eclipse and SVN
- Java JDBC Tutorial with Examples
- Java remote method invocation - Java RMI Tutorial with Examples
- Java Multithreading Programming Tutorial with Examples
- Customize java compiler processing your Annotation (Annotation Processing Tool)
- What is needed to get started with Java?
- Java Aspect Oriented Programming with AspectJ (AOP)
- Understanding Java System.identityHashCode, Object.hashCode and Object.equals
- Java Compression and Decompression Tutorial with Examples
- Java Reflection Tutorial with Examples
- Install OpenJDK on Ubuntu
- Java String.format() and printf() methods
- History of Java and the difference between Oracle JDK and OpenJDK
- Introduction to the Raspberry Pi
- Java Socket Programming Tutorial with Examples
- Java Generics Tutorial with Examples
- Manipulating files and directories in Java
- Java WeakReference Tutorial with Examples
- Java Commons IO Tutorial with Examples
- History of bits and bytes in computer science
- Which Platform Should You Choose for Developing Java Desktop Applications?
- Java SoftReference Tutorial with Examples
- Syntax and new features in Java 8
- Java Annotations Tutorial with Examples
- Java Function Tutorial with Examples
- Access modifiers in Java
- Java BiFunction Tutorial with Examples
- Get the values of the columns automatically increment when Insert a record using JDBC
- Java Functional Interface Tutorial with Examples
- Java BiPredicate Tutorial with Examples
Show More
- Java Servlet/Jsp Tutorials
- Java Collections Framework Tutorials
- Java API for HTML & XML
- Java IO Tutorials
- Java Date Time Tutorials
- Spring Boot Tutorials
- Maven Tutorials
- Gradle Tutorials
- Java Web Services Tutorials
- Java SWT Tutorials
- JavaFX Tutorials
- Java Oracle ADF Tutorials
- Struts2 Framework Tutorials
- Spring Cloud Tutorials