Android TextInputLayout Tutorial with Examples
1. Android TextInputLayout
No ADS
TextInputLayout is an interface component that contains and supports a Text Input Field visually. If EditText is in use, make sure its android:background is @null so that TextInputLayout can set the appropriate background for it.

The hint text automatically pops up when the user focus to EditText.

A Password field with an ImageView on the right allows the password to be displayed.
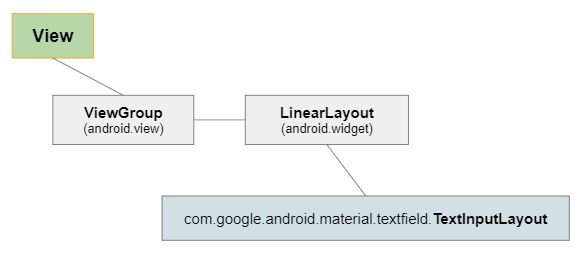
TextInputLayout is a subclass of LinearLayout, so it can arrange child View(s) in a row or a column. When one of its child View(s) is a text input field such as EditText, the other child View(s)act as visual aids.
Note: You can also put TextInputLayout(s) nested to get a more complex interface component.
Library:
TextInputLayout is not available in the Android standard library. Therefore, in order to use it, you need to install it into your project from the Palette of the design view or declare this library manually.
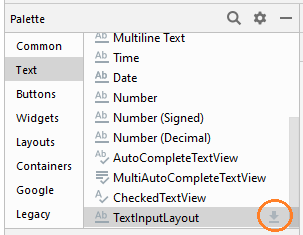
After installing the library from Palette, you will see it be declared in build.gradle (Module: app) file:
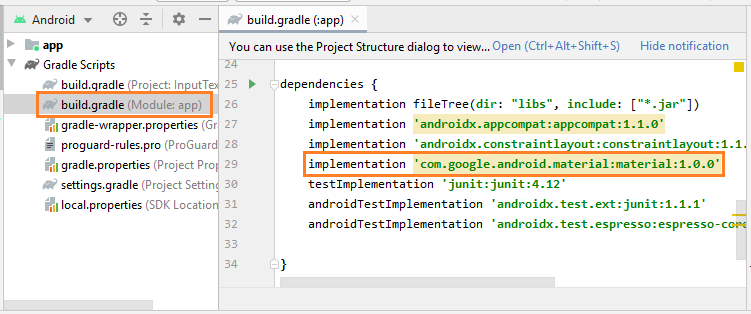
implementation 'com.google.android.material:material:1.0.0'2. Floating Hint
No ADS
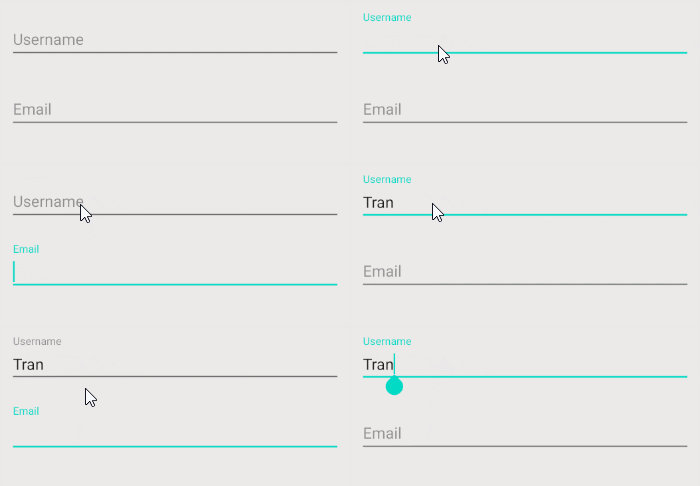
The hint text that automatically pops up when the user focus on an EditText is the basic support feature of TextInputLayout, which you can use it without having to write any extra lines of Java code.
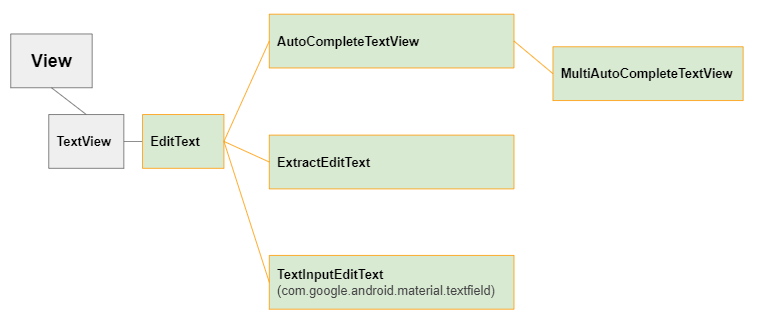
Drag and drop a TextInputLayout in the interface. By default, it will contain a child View named TextInputEditText, a descendant class of EditText.
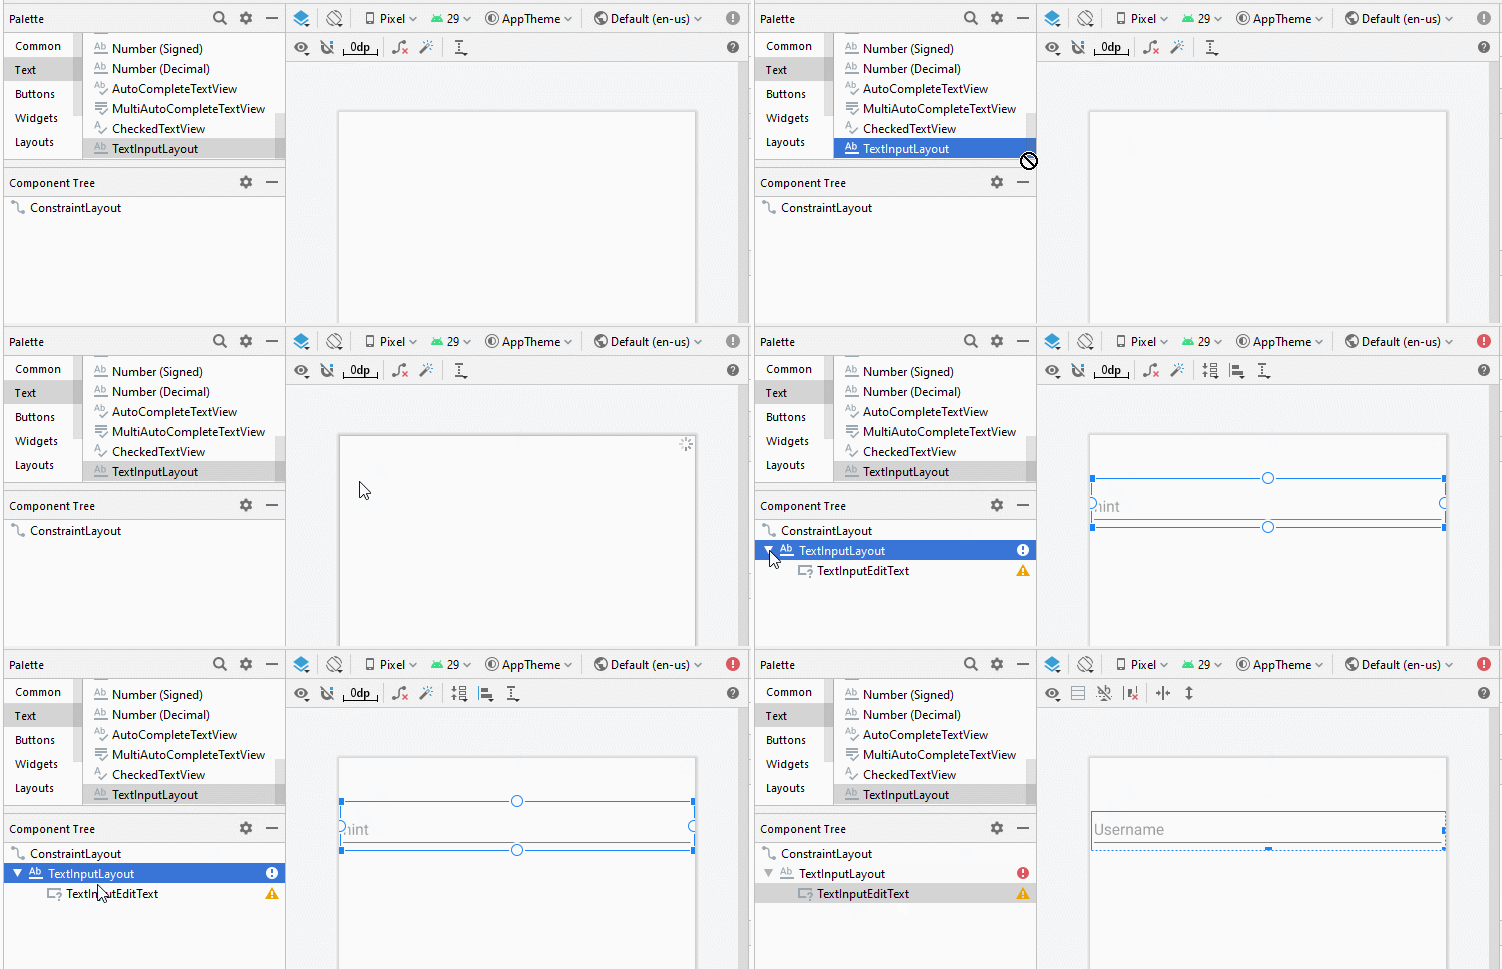
<com.google.android.material.textfield.TextInputLayout
    android:id="@+id/textInputLayout"
    android:layout_width="0dp"
    android:layout_height="wrap_content"
    android:layout_marginStart="16dp"
    android:layout_marginLeft="16dp"
    android:layout_marginTop="50dp"
    android:layout_marginEnd="16dp"
    android:layout_marginRight="16dp"
    app:layout_constraintEnd_toEndOf="parent"
    app:layout_constraintStart_toStartOf="parent"
    app:layout_constraintTop_toTopOf="parent">

    <com.google.android.material.textfield.TextInputEditText
        android:layout_width="match_parent"
        android:layout_height="wrap_content"
        android:hint="Username" />

</com.google.android.material.textfield.TextInputLayout>
Here is the result:
Some attributes related to the "Floating Hint" are:
- app:hintEnabled (Default true)
- app:hintAnimationEnabled (Default true)
- app:hintTextAppearance
app:hintEnabled
The app:hintEnabled attribute is used to enable/disable the "Floating Hint" feature of TextInputLayout. Its default value is true.
app:hintAnimationEnabled
The app:hintAnimationEnabled attribute specifies whether or not an animation appears when the hint text floats. Its default value is true.
app:hintTextAppearance
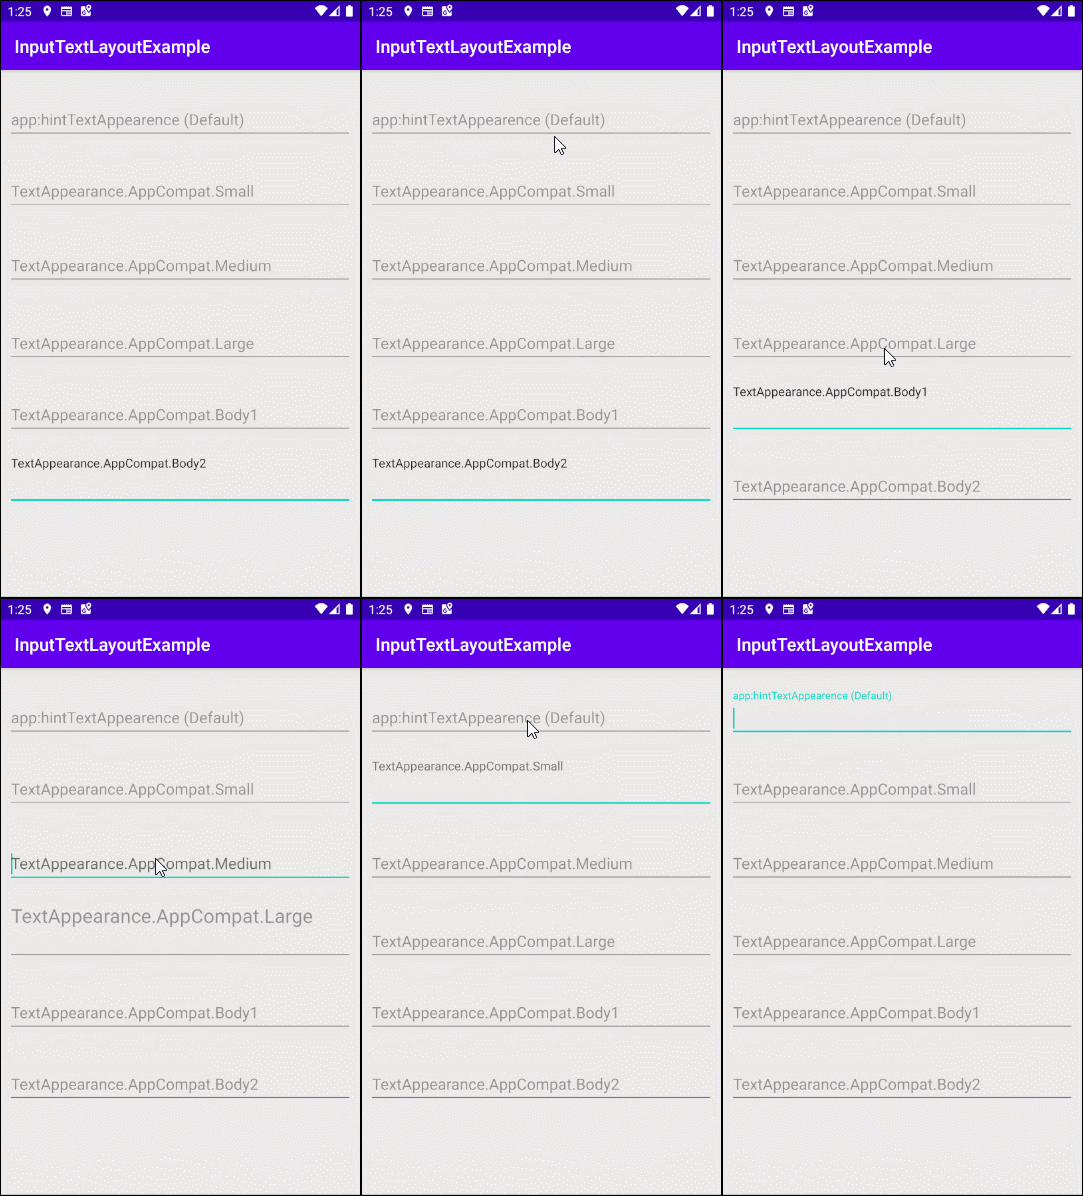
Set the color, size, style, and so on for the hint text.
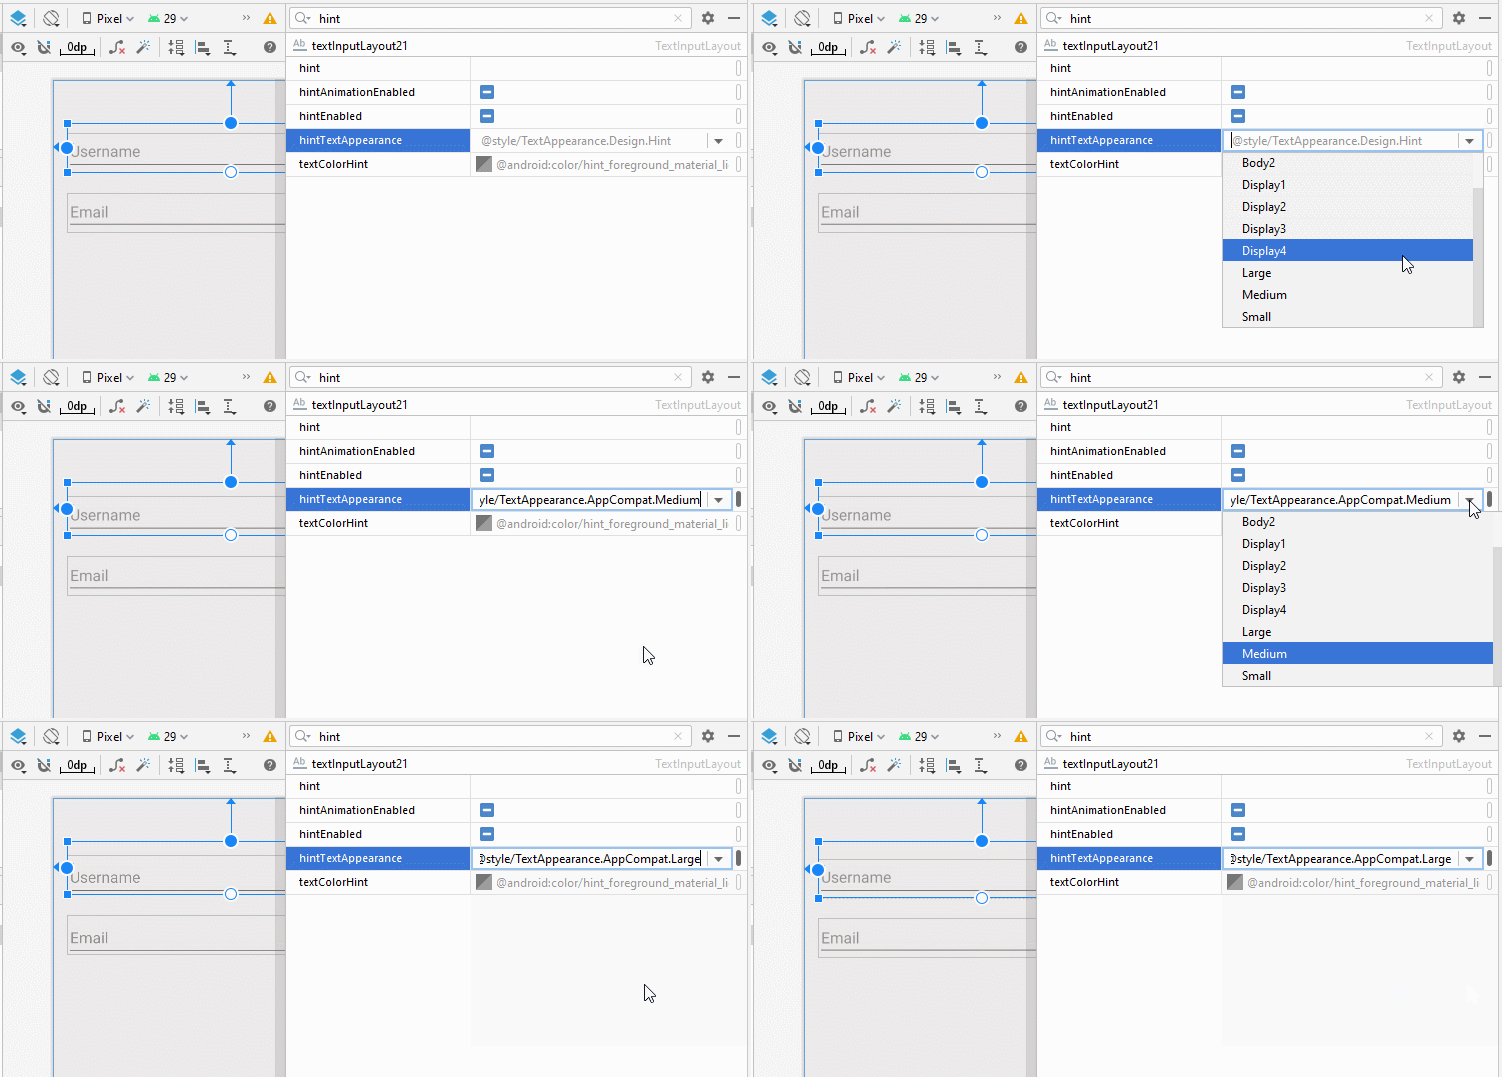
- app:hintTextAppearance="@style/TextAppearance.AppCompat.Large"
- app:hintTextAppearance="@style/TextAppearance.AppCompat.Medium"
- app:hintTextAppearance="@style/TextAppearance.AppCompat.Small"
- app:hintTextAppearance="@style/TextAppearance.AppCompat.Body1"
- app:hintTextAppearance="@style/TextAppearance.AppCompat.Body2"
- app:hintTextAppearance="@style/TextAppearance.AppCompat.Display1"
- app:hintTextAppearance="@style/TextAppearance.AppCompat.Display2"
- app:hintTextAppearance="@style/TextAppearance.AppCompat.Display3"
- app:hintTextAppearance="@style/TextAppearance.AppCompat.Display4"
- ...
3. Character Counting
No ADS
TextInputLayout also supports the character counting feature. It is also one of the most frequently used features in different applications.

Drag and drop a TextInputLayout in the interface. By default, it contains a TextInputEditText:
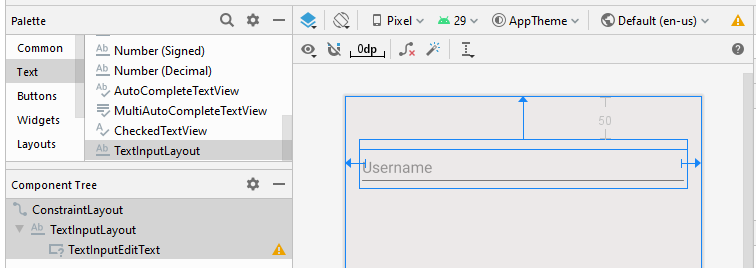
Next: Set values for a few other attributes of TextInputLayout.
- app:counterEnabled = "true"
- app:counterMaxLength: This is an optional attribute to specify the maximum number of characters in texts. This value is used for reports. The user still can enter a text with more characters.

<?xml version="1.0" encoding="utf-8"?>
<androidx.constraintlayout.widget.ConstraintLayout
    xmlns:android="http://schemas.android.com/apk/res/android"
    xmlns:app="http://schemas.android.com/apk/res-auto"
    xmlns:tools="http://schemas.android.com/tools"
    android:layout_width="match_parent"
    android:layout_height="match_parent"
    android:background="#ECE9E9"
    tools:context=".MainActivity">

    <com.google.android.material.textfield.TextInputLayout
        android:id="@+id/textInputLayout21"
        app:counterEnabled="true"
        app:counterMaxLength="10"
        android:layout_width="0dp"
        android:layout_height="wrap_content"
        android:layout_marginStart="16dp"
        android:layout_marginLeft="16dp"
        android:layout_marginTop="50dp"
        android:layout_marginEnd="16dp"
        android:layout_marginRight="16dp"
        app:layout_constraintEnd_toEndOf="parent"
        app:layout_constraintStart_toStartOf="parent"
        app:layout_constraintTop_toTopOf="parent">

        <com.google.android.material.textfield.TextInputEditText
            android:layout_width="match_parent"
            android:layout_height="wrap_content"
            android:hint="Username" />

    </com.google.android.material.textfield.TextInputLayout>

</androidx.constraintlayout.widget.ConstraintLayout>
This is the result you get:

Note: Use the android:maxLength attribute for the Input Field (EditText,..) if you want to limit the number of characters of the text which is guaranteed.
4. Password Visibility Toggle
No ADS
Drag and drop the TextInputLayout in the interface. By default, it has already got TextInputEditText as a child View. After that, set the android:inputType = "textPassword" for the TextInputEditText.
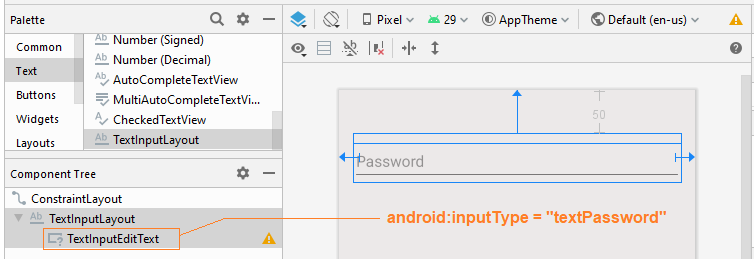
Then set values for the following attributes:
- app:passwordToggleEnabled
- app:passwordToggleDrawable
- app:passwordToggleContentDescription
- app:passwordToggleTint
- app:passwordToggleTintMode

app:passwordEnabled
The app:passwordEnabled="true" is necessary for you to enable the feature of hiding/showing the password for TextInputLayout, while other attributes mentioned above are only optional.

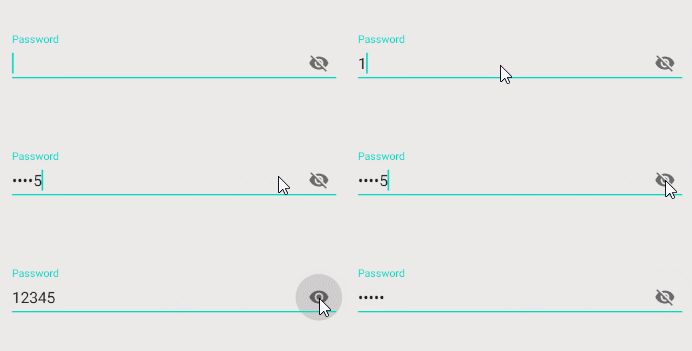
<?xml version="1.0" encoding="utf-8"?>
<androidx.constraintlayout.widget.ConstraintLayout
    xmlns:android="http://schemas.android.com/apk/res/android"
    xmlns:app="http://schemas.android.com/apk/res-auto"
    xmlns:tools="http://schemas.android.com/tools"
    android:layout_width="match_parent"
    android:layout_height="match_parent"
    android:background="#ECE9E9"
    tools:context=".MainActivity">

    <com.google.android.material.textfield.TextInputLayout
        android:layout_width="0dp"
        android:layout_height="wrap_content"
        android:layout_marginStart="16dp"
        android:layout_marginLeft="16dp"
        android:layout_marginTop="50dp"
        android:layout_marginEnd="16dp"
        android:layout_marginRight="16dp"
        app:layout_constraintEnd_toEndOf="parent"
        app:layout_constraintStart_toStartOf="parent"
        app:layout_constraintTop_toTopOf="parent"
        app:passwordToggleEnabled="true">

        <com.google.android.material.textfield.TextInputEditText
            android:layout_width="match_parent"
            android:layout_height="wrap_content"
            android:hint="Password"
            android:inputType="textPassword" />
    </com.google.android.material.textfield.TextInputLayout>

</androidx.constraintlayout.widget.ConstraintLayout>
5. Floating Label Error
No ADS
One of the other features of TextInputLayout is to display a Label notifying the error to the user. However, in order to use this feature, you need to write additional Java code to control the hiding/showing of the Label.
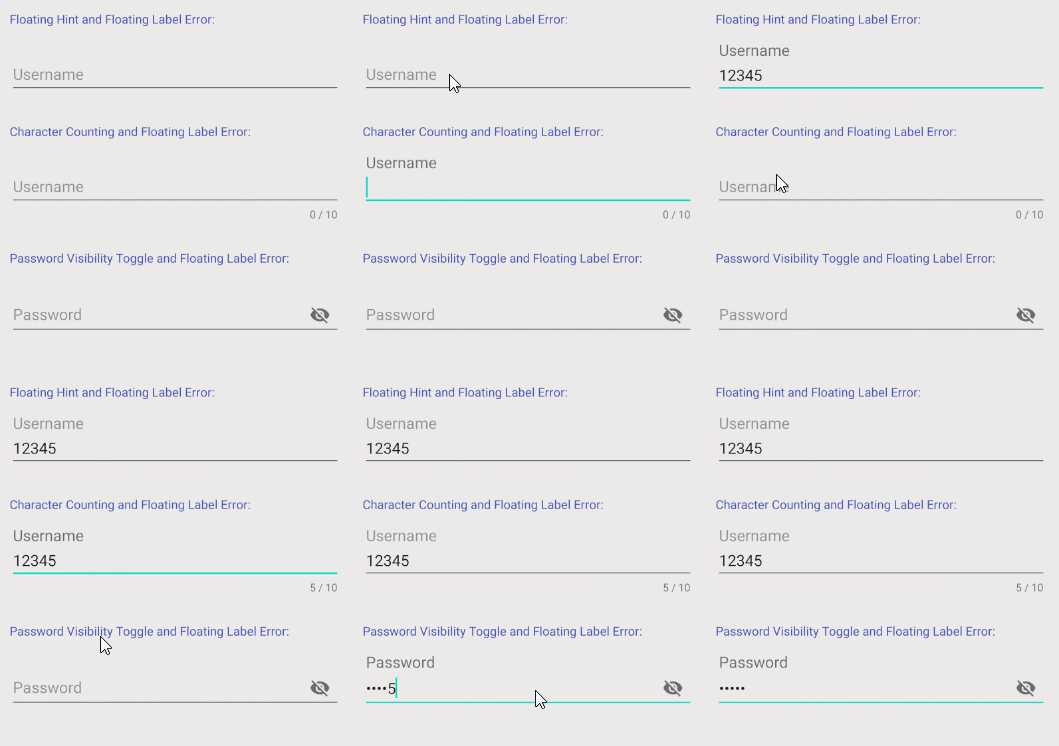
OK, here is a simple example:
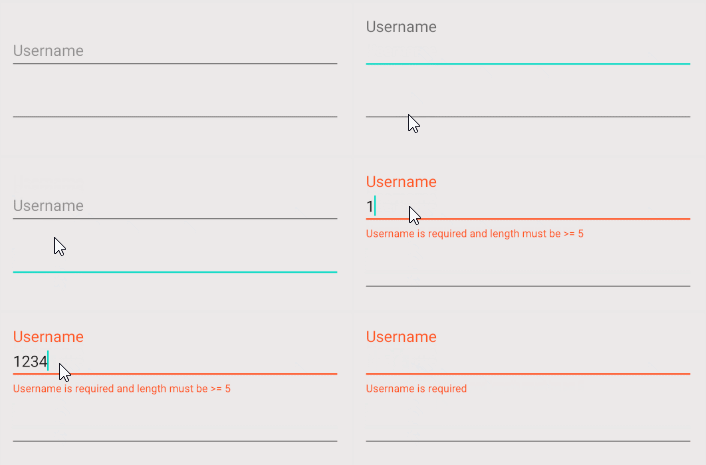
The interface of the example:
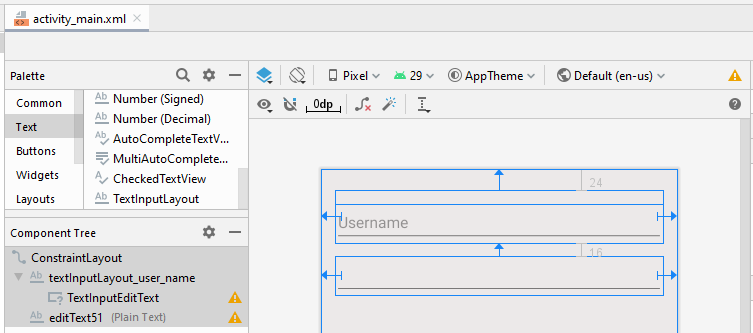
activity_main.xml
<?xml version="1.0" encoding="utf-8"?>
<androidx.constraintlayout.widget.ConstraintLayout
    xmlns:android="http://schemas.android.com/apk/res/android"
    xmlns:app="http://schemas.android.com/apk/res-auto"
    xmlns:tools="http://schemas.android.com/tools"
    android:layout_width="match_parent"
    android:layout_height="match_parent"
    android:background="#ECE9E9"
    tools:context=".MainActivity">

    <com.google.android.material.textfield.TextInputLayout
        android:id="@+id/textInputLayout_user_name"
        android:layout_width="0dp"
        android:layout_height="wrap_content"
        android:layout_marginStart="16dp"
        android:layout_marginLeft="16dp"
        android:layout_marginTop="24dp"
        android:layout_marginEnd="16dp"
        android:layout_marginRight="16dp"
        app:hintTextAppearance="@style/TextAppearance.AppCompat.Medium"
        app:layout_constraintEnd_toEndOf="parent"
        app:layout_constraintStart_toStartOf="parent"
        app:layout_constraintTop_toTopOf="parent">

        <com.google.android.material.textfield.TextInputEditText
            android:layout_width="match_parent"
            android:layout_height="wrap_content"
            android:hint="Username" />
    </com.google.android.material.textfield.TextInputLayout>

    <EditText
        android:id="@+id/editText51"
        android:layout_width="0dp"
        android:layout_height="wrap_content"
        android:layout_marginStart="16dp"
        android:layout_marginLeft="16dp"
        android:layout_marginTop="16dp"
        android:layout_marginEnd="16dp"
        android:layout_marginRight="16dp"
        android:ems="10"
        android:inputType="textPersonName"
        app:layout_constraintEnd_toEndOf="parent"
        app:layout_constraintStart_toStartOf="parent"
        app:layout_constraintTop_toBottomOf="@+id/textInputLayout_user_name" />

</androidx.constraintlayout.widget.ConstraintLayout>
MainActivity.java
package com.example.inputtextlayoutexample;

import android.os.Bundle;
import android.text.Editable;
import android.text.TextWatcher;

import androidx.appcompat.app.AppCompatActivity;

import com.google.android.material.textfield.TextInputLayout;

public class MainActivity extends AppCompatActivity {

    @Override
    protected void onCreate(Bundle savedInstanceState) {
        super.onCreate(savedInstanceState);
        setContentView(R.layout.activity_main);

        this.setupFloatingLabelError();
    }

    private void setupFloatingLabelError() {
        final TextInputLayout textInputLayoutUserName = (TextInputLayout) findViewById(R.id.textInputLayout_user_name);

        textInputLayoutUserName.getEditText().addTextChangedListener(new TextWatcher() {
            // ...
            @Override
            public void onTextChanged(CharSequence text, int start, int count, int after) {
                if (text.length() == 0 ) {
                    textInputLayoutUserName.setError("Username is required");
                    textInputLayoutUserName.setErrorEnabled(true);
                } else if (text.length() < 5 ) {
                    textInputLayoutUserName.setError("Username is required and length must be >= 5");
                    textInputLayoutUserName.setErrorEnabled(true);
                } else {
                    textInputLayoutUserName.setErrorEnabled(false);
                }
            }
            @Override
            public void beforeTextChanged(CharSequence s, int start, int count,
                                          int after) {
            }

            @Override
            public void afterTextChanged(Editable s) {

            }
        });
    }
}6. TextInputLayout Styles
No ADS
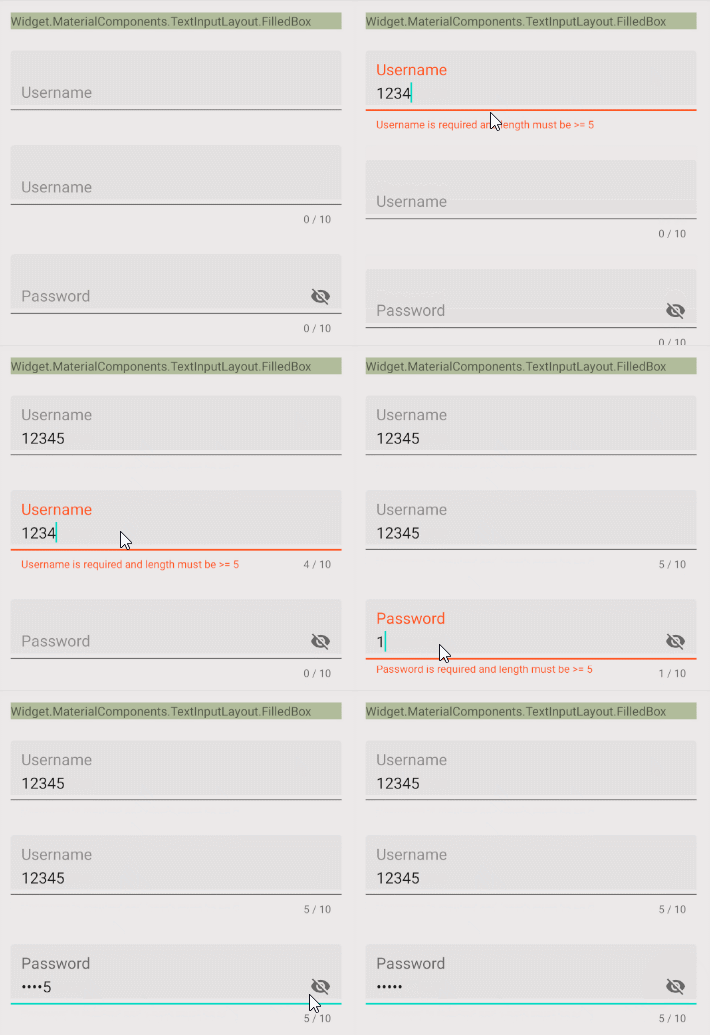
The style attribute is an option of TextInputLayout. It allows you to set the style for TextInputLayout. There are a few styles available in the Android library that may be ready for you to use.
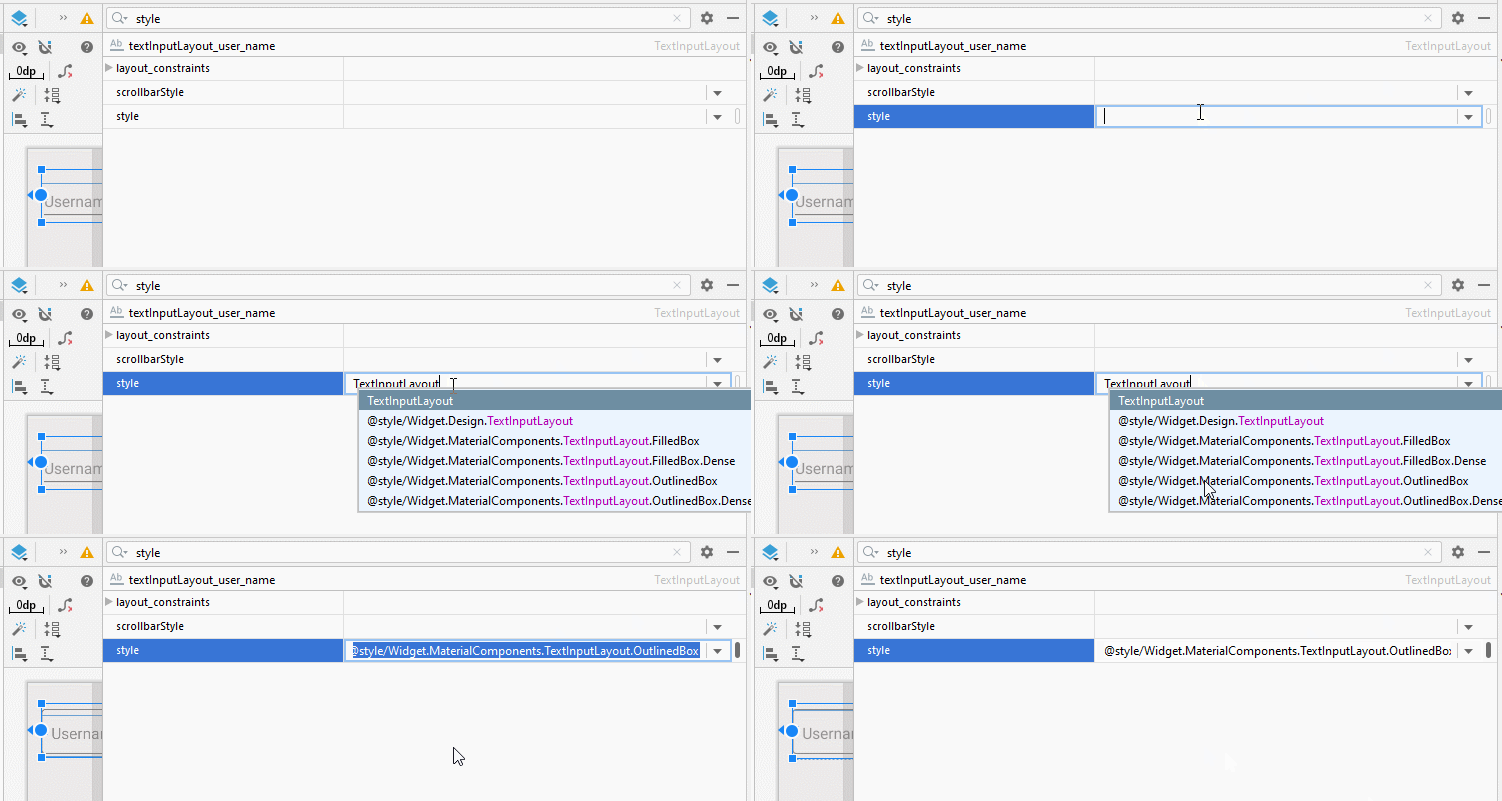
- style="@style/Widget.Design.TextInputLayout"
- style="@style/Widget.MaterialComponents.TextInputLayout.FilledBox"
- style="@style/Widget.MaterialComponents.TextInputLayout.FilledBox.Dense"
- style="@style/Widget.MaterialComponents.TextInputLayout.OutlinedBox"
- style="@style/Widget.MaterialComponents.TextInputLayout.OutlinedBox.Dense"
- ...
style="@style/Widget.MaterialComponents.TextInputLayout.OutlinedBox"
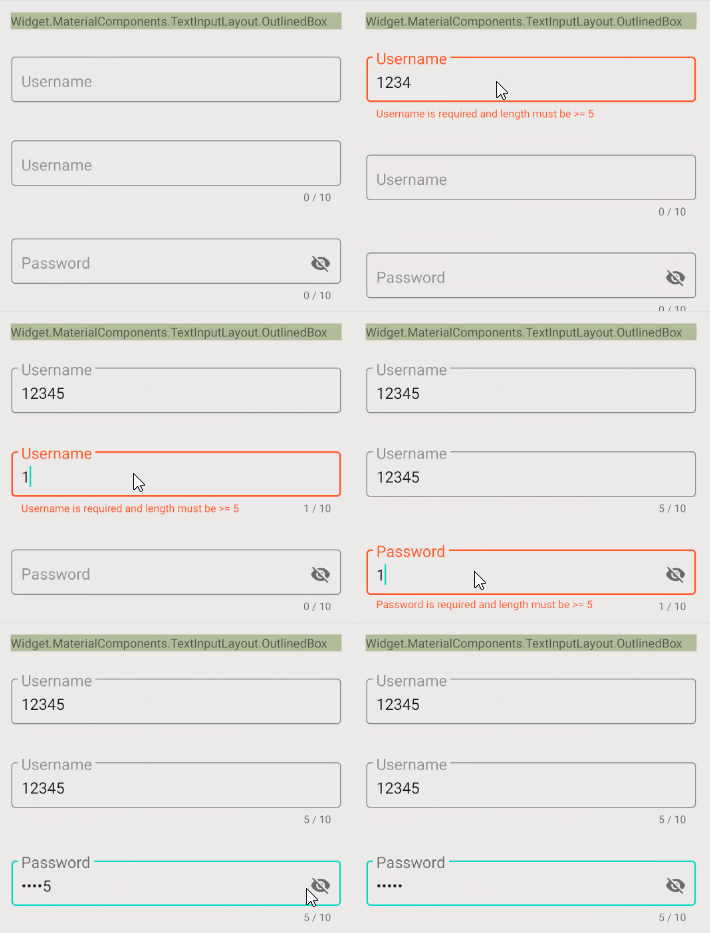
style="@style/Widget.MaterialComponents.TextInputLayout.FilledBox"
No ADS
Android Programming Tutorials
- Format Credit Card Number with Android TextWatcher
- Android Networking Tutorial with Examples
- Android TextInputLayout Tutorial with Examples
- Create a simple File Finder Dialog in Android
- Android AutoCompleteTextView and MultiAutoCompleteTextView Tutorial with Examples
- Using image assets and icon assets of Android Studio
- Android AsyncTaskLoader Tutorial with Examples
- Android ImageSwitcher Tutorial with Examples
- Android TimePickerDialog Tutorial with Examples
- Android FrameLayout Tutorial with Examples
- Android TimePicker Tutorial with Examples
- How to disable the permissions already granted to the Android application?
- Android ContextMenu Tutorial with Examples
- Android Camera Tutorial with Examples
- Get Phone Number in Android using TelephonyManager
- Android Clipboard Tutorial with Examples
- Android DatePickerDialog Tutorial with Examples
- Android SMS Tutorial with Examples
- Android Space Tutorial with Examples
- Android ScrollView and HorizontalScrollView Tutorial with Examples
- Install Android Studio on Windows
- Android VideoView Tutorial with Examples
- Android ProgressBar Tutorial with Examples
- Android External Storage Tutorial with Examples
- Android 2D Game Tutorial for Beginners
- Enable USB Debugging on Android Device
- Android MediaPlayer Tutorial with Examples
- Android Phone Call Tutorial with Examples
- Example of an explicit Android Intent, calling another Intent
- Android TextWatcher Tutorial with Examples
- Configure Android Emulator in Android Studio
- Android PopupMenu Tutorial with Examples
- Android CharacterPickerDialog Tutorial with Examples
- Android ListView with Checkbox using ArrayAdapter
- Android RadioGroup and RadioButton Tutorial with Examples
- Android AsyncTask Tutorial with Examples
- Android SnackBar Tutorial with Examples
- Android Spinner Tutorial with Examples
- Android ListView Tutorial with Examples
- Android TextView Tutorial with Examples
- Android SeekBar Tutorial with Examples
- Android JSON Parser Tutorial with Examples
- How to know the phone number of Android Emulator and change it
- Android LinearLayout Tutorial with Examples
- Android ViewPager2 Tutorial with Examples
- Android Text to Speech Tutorial with Examples
- Android RatingBar Tutorial with Examples
- Android DialogFragment Tutorial with Examples
- Android Wifi Scanning Tutorial with Examples
- Android Fragments Tutorial with Examples
- Create a simple File Chooser in Android
- Android DatePicker Tutorial with Examples
- Example of implicit Android Intent, open a URL, send an email
- Using Android Device File Explorer
- Android ToggleButton Tutorial with Examples
- Google Maps Android API Tutorial with Examples
- How to add external libraries to Android Project in Android Studio?
- Android EditText Tutorial with Examples
- Android ImageButton Tutorial with Examples
- Android Notifications Tutorial with Examples
- Android CheckBox Tutorial with Examples
- Android Services Tutorial with Examples
- Android Dialog Tutorial with Examples
- Android Tutorial for Beginners - Basic examples
- Create a custom Android Toast
- Android Intents Tutorial with Examples
- Android WebView Tutorial with Examples
- Android Chip and ChipGroup Tutorial with Examples
- Android GridView Tutorial with Examples
- Android Switch Tutorial with Examples
- How to remove applications from Android Emulator?
- Android QuickContactBadge Tutorial with Examples
- Android Chronometer Tutorial with Examples
- Android OptionMenu Tutorial with Examples
- Install Intel® HAXM for Android Studio
- Playing Sound effects in Android with SoundPool
- Android Internal Storage Tutorial with Examples
- Android AlertDialog Tutorial with Examples
- Android SharedPreferences Tutorial with Examples
- ChipGroup and Chip Entry Example
- Android SQLite Database Tutorial with Examples
- Android Toast Tutorial with Examples
- Android TableLayout Tutorial with Examples
- Android Button Tutorial with Examples
- Android FloatingActionButton Tutorial with Examples
- What is needed to get started with Android?
- Android UI Layouts Tutorial with Examples
- Android CardView Tutorial with Examples
- Setting SD Card for Android Emulator
- Android ImageView Tutorial with Examples
- Android Tutorial for Beginners - Hello Android
- Android StackView Tutorial with Examples
- Android TextClock Tutorial with Examples
Show More