Android CardView Tutorial with Examples
1. Android CardView
No ADS
Android 5.0 (API Level 21) introduced a new component called CardView, which is basically a rectangular container with four rounded corners and Shawdow effects at the borders. CardView is commonly used as the original container of the Items in ListView, GridView or RecyclerView.
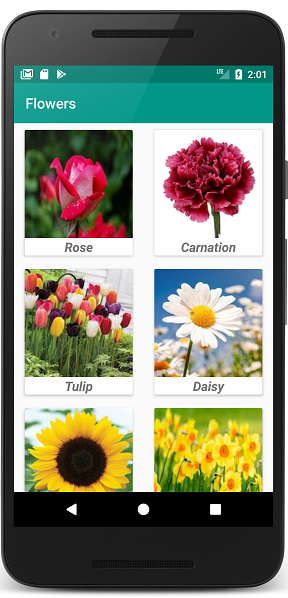
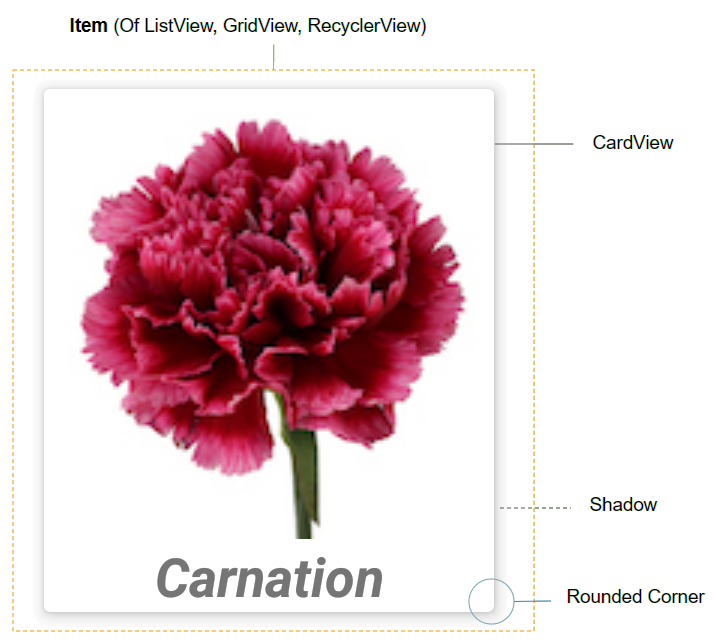
By default, CardView is not available in the Android SDK. If you want to use it, you need to add support libraries to your project.
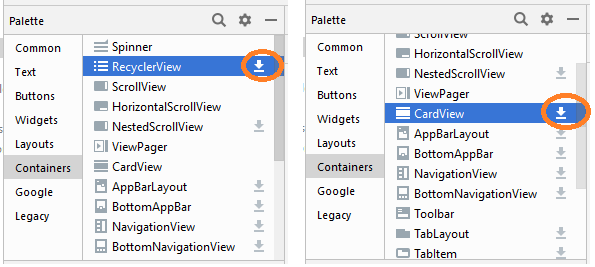
On Android Studio you can download the CardView library from the Palette.
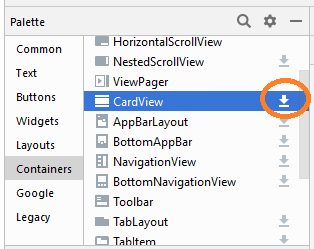
After its installation, you will see the library be declared in build.gradle (Module: app).
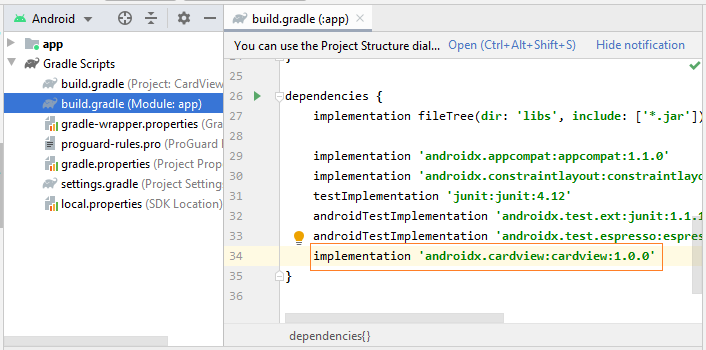
implementation 'androidx.cardview:cardview:1.0.0'Here are some important attributes of CardView that you need:
- android:layout_marginLeft
- android:layout_marginTop
- android:layout_marginRight
- android:layout_marginBottom
- app:cardBackgroundColor
2. An example of CardView
No ADS
Let's set an example of RecyclerView and CardView. Alright, here is the preview image of this example:
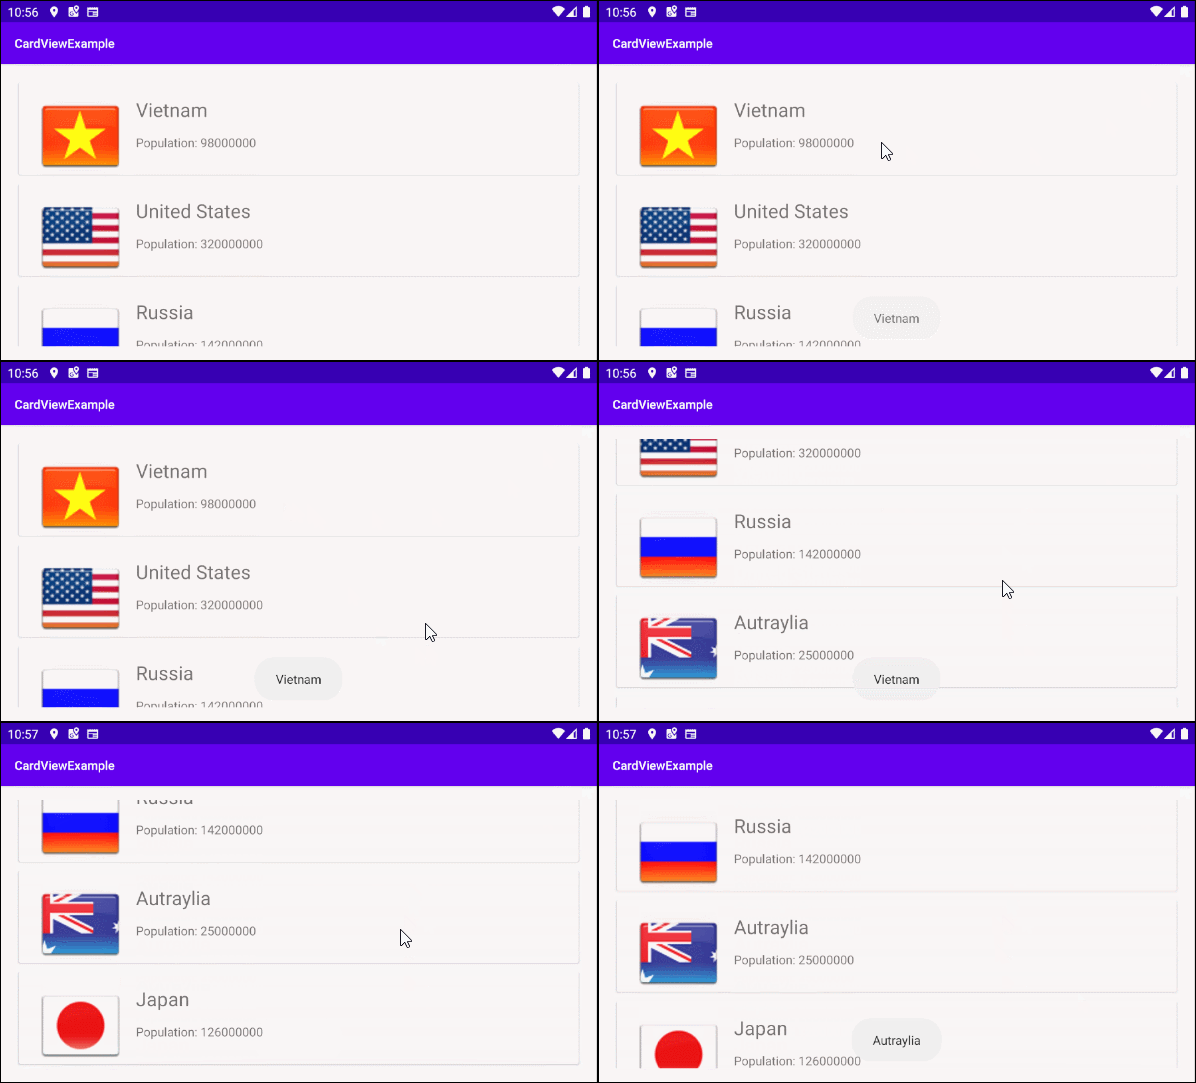
On Android Studio create a project:
- File > New > New Project > Empty Activity
- Name: CardViewExample
- Package name: org.o7planning.cardviewexample
Download RecyclerView and CardView libraries into your project:
After setting, you will see the libraries be declared in build.gradle (Module: app):
implementation 'androidx.cardview:cardview:1.0.0'
implementation 'androidx.recyclerview:recyclerview:1.0.0'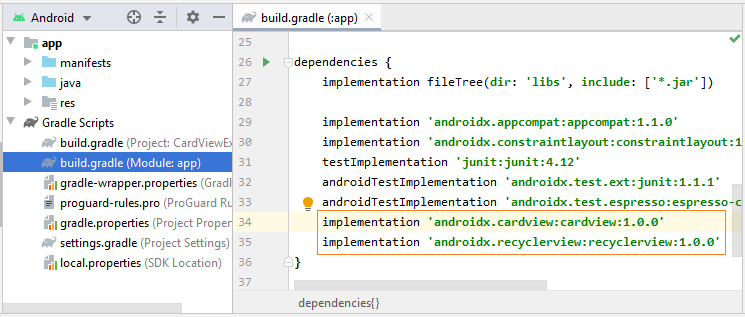
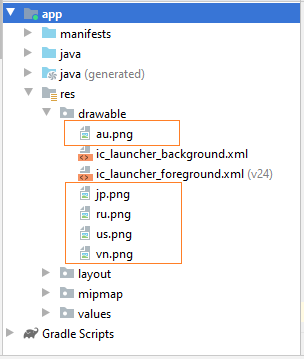
Now we need some image files. Then copy them to the drawable folder of the project:
vn.png | us.png | ru.png | jp.png | au.png |
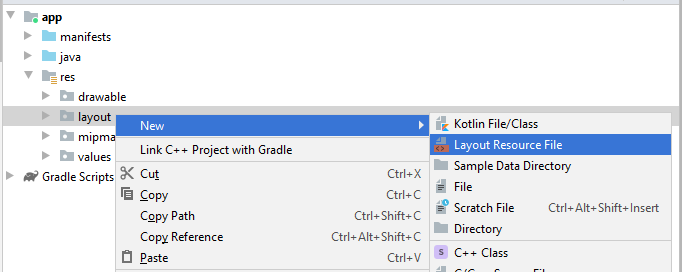
Next, you need to create Layout of the RecyclerView Item. Now right-click on the "res / layout" folder and select:
- New > Layout resource file
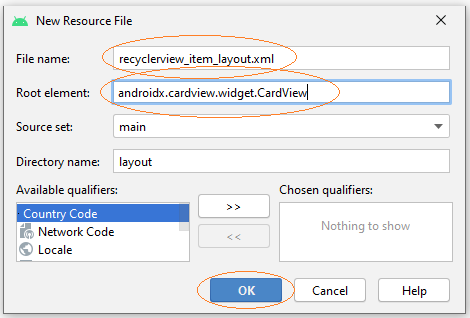
Edit:
- File name: recyclerview_item_layout.xml
- Root element: androidx.cardview.widget.CardView
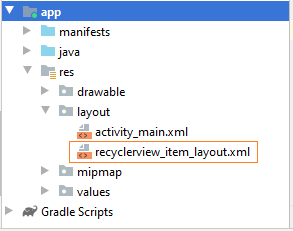
Then design the interface of RecyclerView Item:
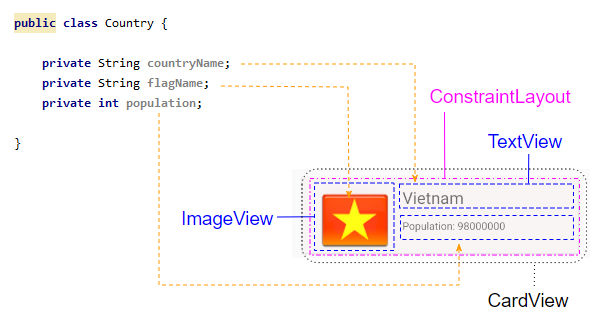
After that, open the recyclerview_item_layout.xml file and set some CardView important attributes:
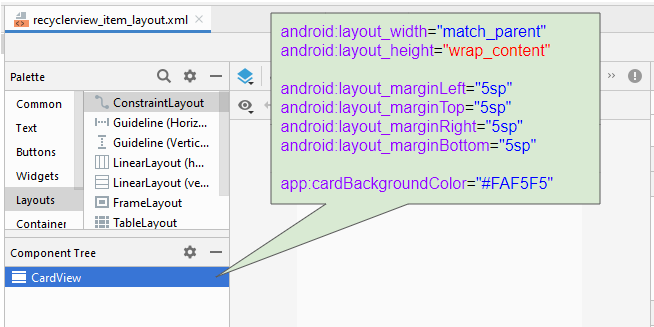
* recyclerview_item_layout.xml *
<?xml version="1.0" encoding="utf-8"?>
<androidx.cardview.widget.CardView
    xmlns:android="http://schemas.android.com/apk/res/android"
    xmlns:app="http://schemas.android.com/apk/res-auto"
    xmlns:tools="http://schemas.android.com/tools"
    android:layout_width="match_parent"
    android:layout_height="wrap_content"
    android:layout_marginLeft="5sp"
    android:layout_marginTop="5sp"
    android:layout_marginRight="5sp"
    android:layout_marginBottom="5sp"
    app:cardBackgroundColor="#FAF5F5">

</androidx.cardview.widget.CardView>
Continue to design the RecyclerView Item interface:
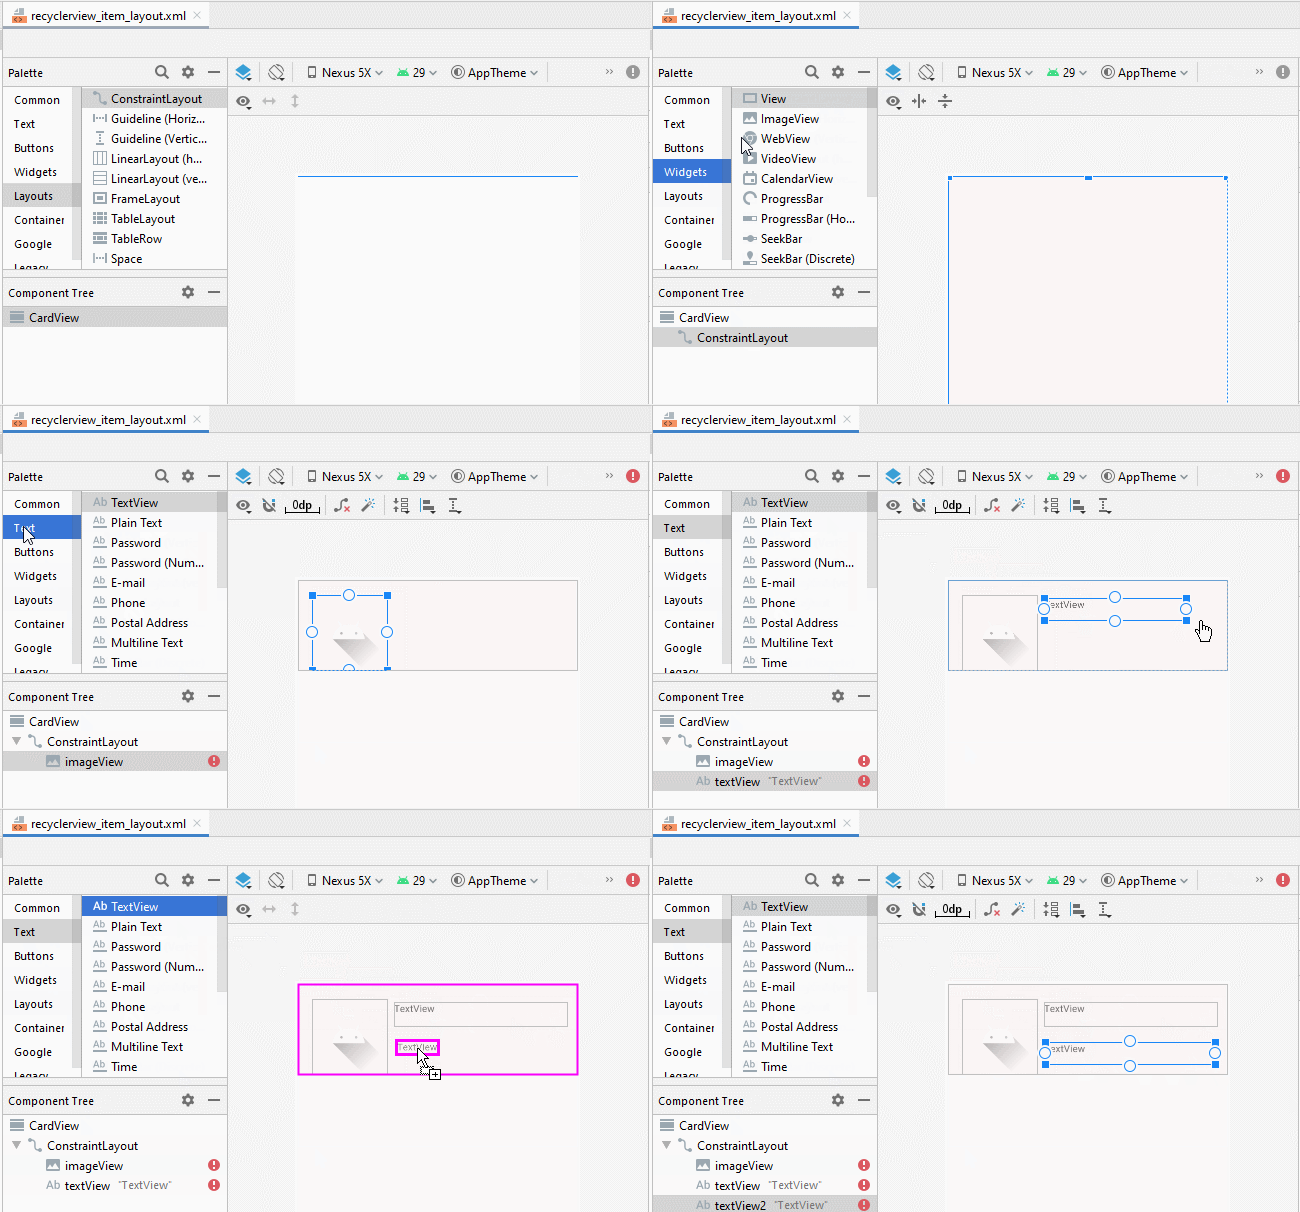
Later, adjust the positions of components in the interface:
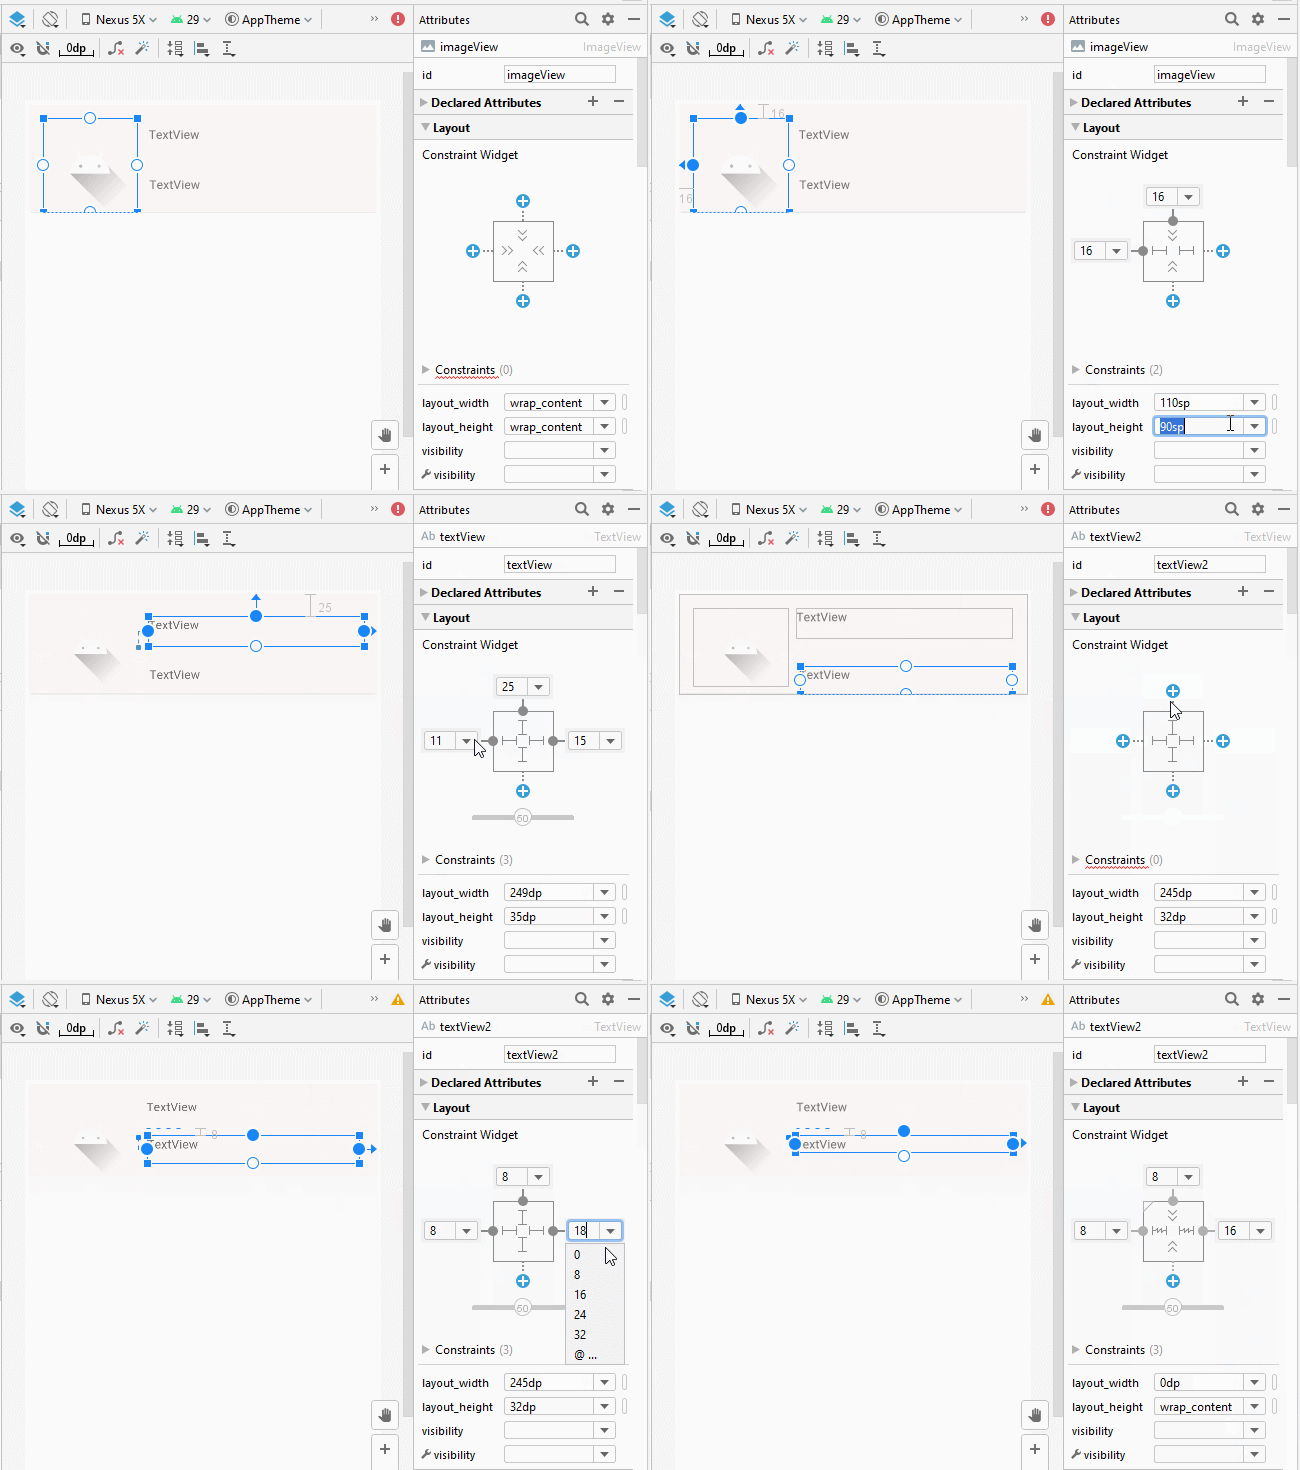
Next, set ID, Text, textSize for the components in the interface:
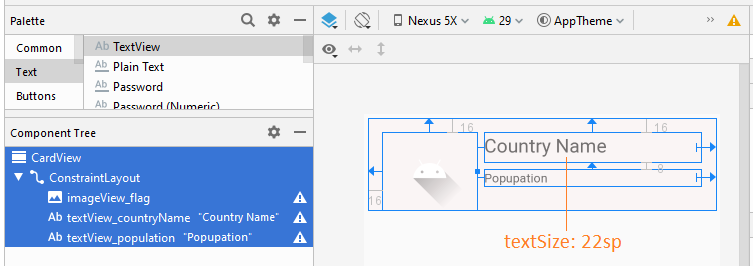
recyclerview_item_layout.xml
<?xml version="1.0" encoding="utf-8"?>
<androidx.cardview.widget.CardView
    xmlns:android="http://schemas.android.com/apk/res/android"
    xmlns:app="http://schemas.android.com/apk/res-auto"
    xmlns:tools="http://schemas.android.com/tools"
    android:layout_width="match_parent"
    android:layout_height="wrap_content"
    android:layout_marginLeft="5sp"
    android:layout_marginTop="5sp"
    android:layout_marginRight="5sp"
    android:layout_marginBottom="5sp"
    app:cardBackgroundColor="#FAF5F5">

    <androidx.constraintlayout.widget.ConstraintLayout
        android:layout_width="match_parent"
        android:layout_height="match_parent">

        <ImageView
            android:id="@+id/imageView_flag"
            android:layout_width="110sp"
            android:layout_height="90sp"
            android:layout_marginStart="16dp"
            android:layout_marginLeft="16dp"
            android:layout_marginTop="16dp"
            app:layout_constraintStart_toStartOf="parent"
            app:layout_constraintTop_toTopOf="parent"
            app:srcCompat="@drawable/ic_launcher_foreground"
            tools:ignore="VectorDrawableCompat" />

        <TextView
            android:id="@+id/textView_countryName"
            android:layout_width="0dp"
            android:layout_height="35dp"
            android:layout_marginStart="8dp"
            android:layout_marginLeft="8dp"
            android:layout_marginTop="16dp"
            android:layout_marginEnd="16dp"
            android:layout_marginRight="16dp"
            android:text="Country Name"
            android:textSize="22sp"
            app:layout_constraintEnd_toEndOf="parent"
            app:layout_constraintStart_toEndOf="@+id/imageView_flag"
            app:layout_constraintTop_toTopOf="parent" />

        <TextView
            android:id="@+id/textView_population"
            android:layout_width="0dp"
            android:layout_height="wrap_content"
            android:layout_marginStart="8dp"
            android:layout_marginLeft="8dp"
            android:layout_marginTop="8dp"
            android:layout_marginEnd="16dp"
            android:layout_marginRight="16dp"
            android:text="Popupation"
            app:layout_constraintEnd_toEndOf="parent"
            app:layout_constraintStart_toEndOf="@+id/imageView_flag"
            app:layout_constraintTop_toBottomOf="@+id/textView_countryName" />
    </androidx.constraintlayout.widget.ConstraintLayout>
</androidx.cardview.widget.CardView>
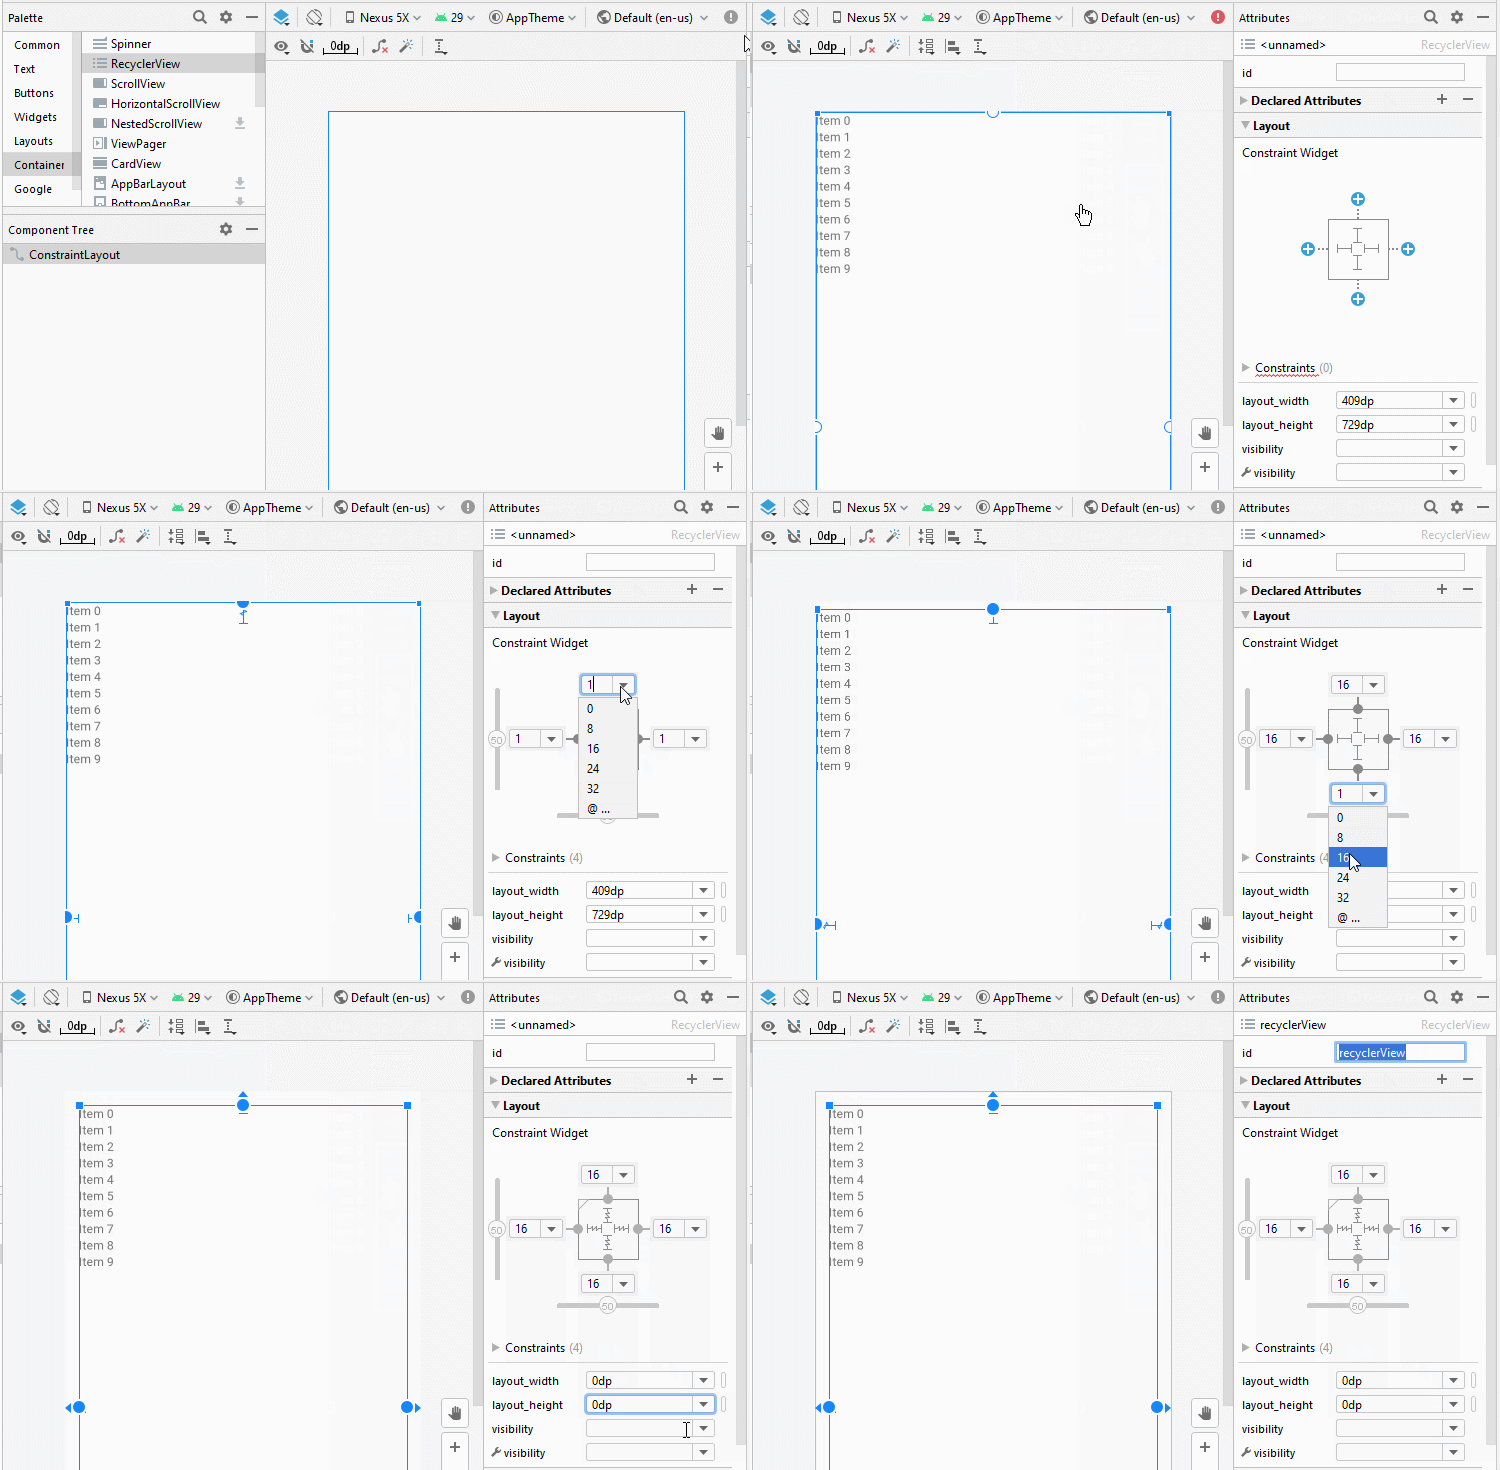
Last but not least, design the activity_main.xml interface:
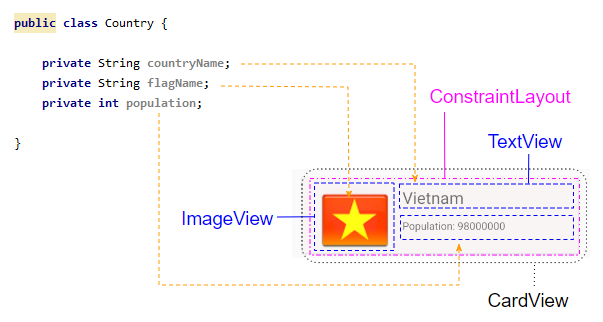
Country.java
package org.o7planning.cardviewexample;

public class Country {

    private String countryName;

    // Image name (Without extension)
    private String flagName;
    private int population;

    public Country(String countryName, String flagName, int population) {
        this.countryName= countryName;
        this.flagName= flagName;
        this.population= population;
    }

    public int getPopulation() {
        return population;
    }

    public void setPopulation(int population) {
        this.population = population;
    }

    public String getCountryName() {
        return countryName;
    }

    public void setCountryName(String countryName) {
        this.countryName = countryName;
    }

    public String getFlagName() {
        return flagName;
    }

    public void setFlagName(String flagName) {
        this.flagName = flagName;
    }

    @Override
    public String toString()  {
        return this.countryName+" (Population: "+ this.population+")";
    }
}
activity_main.xml
<?xml version="1.0" encoding="utf-8"?>
<androidx.constraintlayout.widget.ConstraintLayout
    xmlns:android="http://schemas.android.com/apk/res/android"
    xmlns:app="http://schemas.android.com/apk/res-auto"
    xmlns:tools="http://schemas.android.com/tools"
    android:layout_width="match_parent"
    android:layout_height="match_parent"
    tools:context=".MainActivity">

    <androidx.recyclerview.widget.RecyclerView
        android:id="@+id/recyclerView"
        android:layout_width="0dp"
        android:layout_height="0dp"
        android:layout_marginStart="16dp"
        android:layout_marginLeft="16dp"
        android:layout_marginTop="16dp"
        android:layout_marginEnd="16dp"
        android:layout_marginRight="16dp"
        android:layout_marginBottom="16dp"
        app:layout_constraintBottom_toBottomOf="parent"
        app:layout_constraintEnd_toEndOf="parent"
        app:layout_constraintStart_toStartOf="parent"
        app:layout_constraintTop_toTopOf="parent" />
</androidx.constraintlayout.widget.ConstraintLayout>
CustomRecyclerViewAdapter is a class extending from RecyclerView.Adapter, it is responsible for displaying data on the RecyclerView Item.
CustomRecyclerViewAdapter.java
package org.o7planning.cardviewexample;
import android.content.Context;
import android.util.Log;
import android.view.LayoutInflater;
import android.view.View;
import android.view.ViewGroup;
import android.widget.Toast;

import androidx.recyclerview.widget.RecyclerView;

import java.util.List;

public class CustomRecyclerViewAdapter extends RecyclerView.Adapter<CountryViewHolder> {


    private List<Country> countries;
    private Context context;
    private LayoutInflater mLayoutInflater;

    public CustomRecyclerViewAdapter(Context context, List<Country> datas ) {
        this.context = context;
        this.countries = datas;
        this.mLayoutInflater = LayoutInflater.from(context);
    }

    @Override
    public CountryViewHolder onCreateViewHolder(final ViewGroup parent, int viewType) {
        // Inflate view from recyclerview_item_layout.xml
        View recyclerViewItem = mLayoutInflater.inflate(R.layout.recyclerview_item_layout, parent, false);

        recyclerViewItem.setOnClickListener(new View.OnClickListener() {
            @Override
            public void onClick(View v) {
                handleRecyclerItemClick( (RecyclerView)parent, v);
            }
        });
        return new CountryViewHolder(recyclerViewItem);
    }


    @Override
    public void onBindViewHolder(CountryViewHolder holder, int position) {
        // Cet country in countries via position
        Country country = this.countries.get(position);

        int imageResId = this.getDrawableResIdByName(country.getFlagName());
        // Bind data to viewholder
        holder.flagView.setImageResource(imageResId);
        holder.countryNameView.setText(country.getCountryName() );
        holder.populationView.setText("Population: "+ country.getPopulation());
    }

    @Override
    public int getItemCount() {
        return this.countries.size();
    }

    // Find Image ID corresponding to the name of the image (in the directory drawable).
    public int getDrawableResIdByName(String resName)  {
        String pkgName = context.getPackageName();
        // Return 0 if not found.
        int resID = context.getResources().getIdentifier(resName , "drawable", pkgName);
        Log.i(MainActivity.LOG_TAG, "Res Name: "+ resName+"==> Res ID = "+ resID);
        return resID;
    }

    // Click on RecyclerView Item.
    private void handleRecyclerItemClick(RecyclerView recyclerView, View itemView) {
        int itemPosition = recyclerView.getChildLayoutPosition(itemView);
        Country country  = this.countries.get(itemPosition);

        Toast.makeText(this.context, country.getCountryName(), Toast.LENGTH_LONG).show();
    }
}
CountryViewHolder.java
package org.o7planning.cardviewexample;

import android.view.View;
import android.widget.ImageView;
import android.widget.TextView;

import androidx.annotation.NonNull;
import androidx.recyclerview.widget.RecyclerView;

public class CountryViewHolder extends   RecyclerView.ViewHolder {

    ImageView flagView;
    TextView countryNameView;
    TextView populationView;

    // @itemView: recyclerview_item_layout.xml
    public CountryViewHolder(@NonNull View itemView) {
        super(itemView);

        this.flagView = (ImageView) itemView.findViewById(R.id.imageView_flag);
        this.countryNameView = (TextView) itemView.findViewById(R.id.textView_countryName);
        this.populationView = (TextView) itemView.findViewById(R.id.textView_population);
    }
}
MainActivity.java
package org.o7planning.cardviewexample;

import android.os.Bundle;

import androidx.appcompat.app.AppCompatActivity;
import androidx.recyclerview.widget.LinearLayoutManager;
import androidx.recyclerview.widget.RecyclerView;

import java.util.ArrayList;
import java.util.List;

public class MainActivity extends AppCompatActivity {

    public static final String LOG_TAG = "AndroidExample";
    private RecyclerView recyclerView;

    @Override
    protected void onCreate(Bundle savedInstanceState) {
        super.onCreate(savedInstanceState);
        setContentView(R.layout.activity_main);


        List<Country> countries = getListData();
        this.recyclerView = (RecyclerView) this.findViewById(R.id.recyclerView);
        recyclerView.setAdapter(new CustomRecyclerViewAdapter(this, countries));

        // RecyclerView scroll vertical
        LinearLayoutManager linearLayoutManager = new LinearLayoutManager(this, LinearLayoutManager.VERTICAL, false);
        recyclerView.setLayoutManager(linearLayoutManager);
    }

    private  List<Country> getListData() {
        List<Country> list = new ArrayList<Country>();
        Country vietnam = new Country("Vietnam", "vn", 98000000);
        Country usa = new Country("United States", "us", 320000000);
        Country russia = new Country("Russia", "ru", 142000000);
        Country autraylia = new Country("Autraylia", "au", 25000000);
        Country japan = new Country("Japan", "jp", 126000000);

        list.add(vietnam);
        list.add(usa);
        list.add(russia);
        list.add(autraylia);
        list.add(japan);

        return list;
    }


}
No ADS
Android Programming Tutorials
- Format Credit Card Number with Android TextWatcher
- Android Networking Tutorial with Examples
- Android TextInputLayout Tutorial with Examples
- Create a simple File Finder Dialog in Android
- Android AutoCompleteTextView and MultiAutoCompleteTextView Tutorial with Examples
- Using image assets and icon assets of Android Studio
- Android AsyncTaskLoader Tutorial with Examples
- Android ImageSwitcher Tutorial with Examples
- Android TimePickerDialog Tutorial with Examples
- Android FrameLayout Tutorial with Examples
- Android TimePicker Tutorial with Examples
- How to disable the permissions already granted to the Android application?
- Android ContextMenu Tutorial with Examples
- Android Camera Tutorial with Examples
- Get Phone Number in Android using TelephonyManager
- Android Clipboard Tutorial with Examples
- Android DatePickerDialog Tutorial with Examples
- Android SMS Tutorial with Examples
- Android Space Tutorial with Examples
- Android ScrollView and HorizontalScrollView Tutorial with Examples
- Install Android Studio on Windows
- Android VideoView Tutorial with Examples
- Android ProgressBar Tutorial with Examples
- Android External Storage Tutorial with Examples
- Android 2D Game Tutorial for Beginners
- Enable USB Debugging on Android Device
- Android MediaPlayer Tutorial with Examples
- Android Phone Call Tutorial with Examples
- Example of an explicit Android Intent, calling another Intent
- Android TextWatcher Tutorial with Examples
- Configure Android Emulator in Android Studio
- Android PopupMenu Tutorial with Examples
- Android CharacterPickerDialog Tutorial with Examples
- Android ListView with Checkbox using ArrayAdapter
- Android RadioGroup and RadioButton Tutorial with Examples
- Android AsyncTask Tutorial with Examples
- Android SnackBar Tutorial with Examples
- Android Spinner Tutorial with Examples
- Android ListView Tutorial with Examples
- Android TextView Tutorial with Examples
- Android SeekBar Tutorial with Examples
- Android JSON Parser Tutorial with Examples
- How to know the phone number of Android Emulator and change it
- Android LinearLayout Tutorial with Examples
- Android ViewPager2 Tutorial with Examples
- Android Text to Speech Tutorial with Examples
- Android RatingBar Tutorial with Examples
- Android DialogFragment Tutorial with Examples
- Android Wifi Scanning Tutorial with Examples
- Android Fragments Tutorial with Examples
- Create a simple File Chooser in Android
- Android DatePicker Tutorial with Examples
- Example of implicit Android Intent, open a URL, send an email
- Using Android Device File Explorer
- Android ToggleButton Tutorial with Examples
- Google Maps Android API Tutorial with Examples
- How to add external libraries to Android Project in Android Studio?
- Android EditText Tutorial with Examples
- Android ImageButton Tutorial with Examples
- Android Notifications Tutorial with Examples
- Android CheckBox Tutorial with Examples
- Android Services Tutorial with Examples
- Android Dialog Tutorial with Examples
- Android Tutorial for Beginners - Basic examples
- Create a custom Android Toast
- Android Intents Tutorial with Examples
- Android WebView Tutorial with Examples
- Android Chip and ChipGroup Tutorial with Examples
- Android GridView Tutorial with Examples
- Android Switch Tutorial with Examples
- How to remove applications from Android Emulator?
- Android QuickContactBadge Tutorial with Examples
- Android Chronometer Tutorial with Examples
- Android OptionMenu Tutorial with Examples
- Install Intel® HAXM for Android Studio
- Playing Sound effects in Android with SoundPool
- Android Internal Storage Tutorial with Examples
- Android AlertDialog Tutorial with Examples
- Android SharedPreferences Tutorial with Examples
- ChipGroup and Chip Entry Example
- Android SQLite Database Tutorial with Examples
- Android Toast Tutorial with Examples
- Android TableLayout Tutorial with Examples
- Android Button Tutorial with Examples
- Android FloatingActionButton Tutorial with Examples
- What is needed to get started with Android?
- Android UI Layouts Tutorial with Examples
- Android CardView Tutorial with Examples
- Setting SD Card for Android Emulator
- Android ImageView Tutorial with Examples
- Android Tutorial for Beginners - Hello Android
- Android StackView Tutorial with Examples
- Android TextClock Tutorial with Examples
Show More